
Vehicle listings with high-quality photos receive up to 5x more engagement than those without, yet most dealership lots are still producing inventory images that fail before a buyer even reads the price. The issue isn’t usually the camera, it’s the settings. The wrong ISO muddies a black paint finish. An uncontrolled shutter softens the body lines that justify the asking price. A blown-out hood tells a buyer you don’t sweat the details. This guide covers the exact camera settings that produce clean, conversion-ready vehicle images in every condition, and where AI tools take over once the shutter closes.
What Are Car Photography Camera Settings?
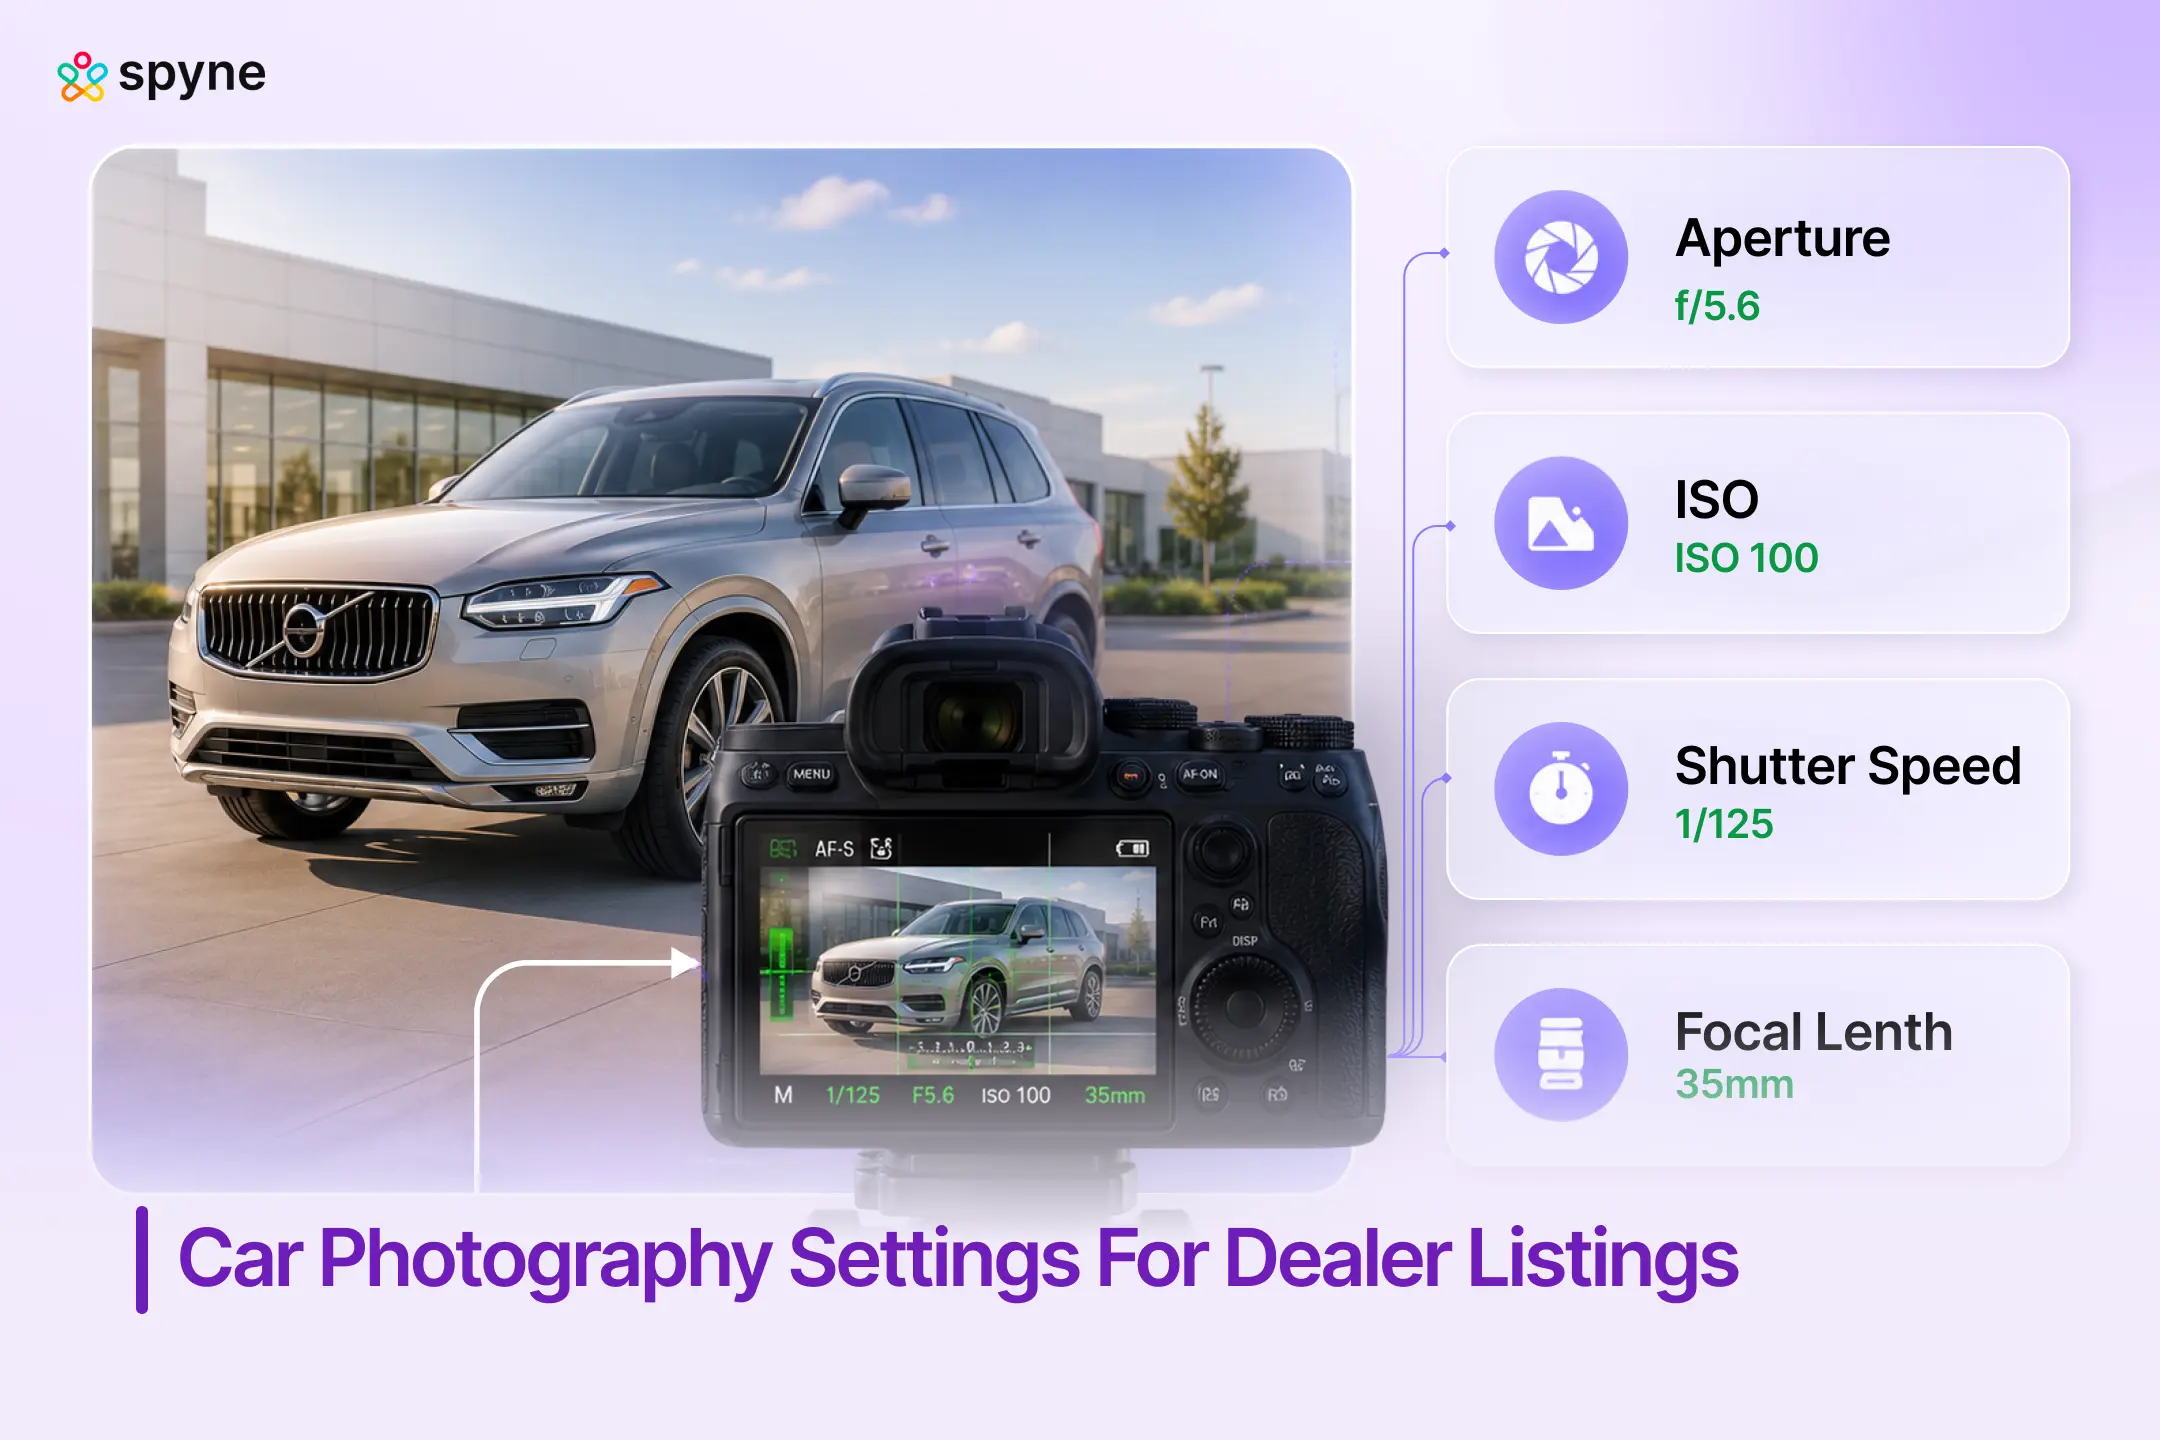
Camera settings for car photography are the adjustable parameters, aperture, shutter speed, ISO, white balance, and focus mode, that determine how light is captured and how the image is rendered. Together, these form the exposure triangle that every dealership photographer needs to understand before picking up a camera.
Cars present a specific photographic challenge: highly reflective surfaces, glossy paint, chrome trim, glass, respond dramatically to small setting errors. Overexpose slightly and you blow out the hood. Underexpose and the body lines disappear into shadow. Unlike portraits or landscapes, a car’s form is the product. A car photography guide covers these fundamentals end to end.
#1- The Core Settings, Aperture, ISO, Shutter Speed Explained
Aperture
Aperture controls depth of field, how much of the vehicle is in sharp focus. For full-exterior listing shots, f/8 to f/11 keeps the entire vehicle sharp from bumper to bumper. For creative hero shots where you want background separation, f/2.8 to f/5.6 produces natural blur without a fake-looking result.
- Full exterior shots: f/8–f/11
- Hero / creative shots: f/2.8–f/5.6
- Interior shots: f/4–f/5.6 to balance sharpness with light intake
- Detail shots (badge, wheel, stitching): f/2.8 for subject isolation
Shutter Speed
Shutter speed determines sharpness for stationary vehicles and blur for moving ones. On a lot, 1/250s is the safe default, fast enough to freeze any ambient motion without requiring high ISO in normal daylight. For panning shots of moving vehicles, 1/30s to 1/125s creates intentional motion blur on the background that conveys speed.
- Stationary exterior (daylight): 1/250s or faster
- Overcast or flat light: 1/125s, then open aperture before raising ISO
- Motion / panning: 1/30s–1/125s (requires practice and tripod)
- Night / studio with tripod: 30–60 seconds at f/11
ISO
ISO controls sensor sensitivity, and noise. Keep ISO as low as possible. At ISO 100–200, paint finishes render cleanly. At ISO 800+, grain appears in dark paint, shadowed interiors, and black trim, exactly the areas buyers examine closely. Raise ISO only after maximizing aperture and slowing shutter speed.
- Bright outdoor daylight: ISO 100
- Overcast / open shade: ISO 100–200
- Interior photography: ISO 400–800 maximum
- Night photography with tripod: ISO 100
#2- Master Settings Reference: Every Shooting Condition
Use this table as a quick reference for any shooting scenario. These are starting baselines, adjust based on how your specific lot is oriented, time of day, and whether clouds are diffusing the light.
| Setting | Exterior (Day) | Interior | Night / Studio |
|---|---|---|---|
| Aperture | f/8–f/11 | f/4–f/5.6 | f/11 |
| Shutter Speed | 1/250s | 1/125–1/250s | 30–60s (tripod) |
| ISO | 100 | 400–800 | 100 |
| White Balance | Auto or Daylight | Auto or Tungsten | Manual / Kelvin |
| Focus Mode | Single AF | Single AF | Manual Focus |
| Format | RAW preferred | RAW preferred | RAW required |
RAW format is strongly recommended for inventory photography. It retains far more post-processing latitude than JPEG, particularly for correcting white balance, recovering blown highlights on white/silver paint, and adjusting shadow detail on dark interiors. For more on how car photography lighting interacts with these settings, see our dedicated guide.
#3- Camera Settings by Shooting Condition
Daytime Exterior, Lot Photography
The most common dealership scenario. Midday sun is a mixed condition, bright enough to keep ISO at 100, but harsh enough to produce blown-out hoods and deep windshield shadows. Overcast days are actually preferable: cloud cover acts as a natural diffuser, producing even light with no harsh reflections.
- Avoid shooting between 11am and 2pm on sunny days, harsh overhead sun flattens body lines
- Position the vehicle so the sun is behind or to the side of the camera, not in front
- Slightly underexpose by -0.3 to -0.7 EV in bright sun to protect highlights, recover shadows in post car photography angles.
Golden Hour
Golden hour, the 30–60 minutes after sunrise and before sunset, produces warm, directional light that flatters almost any paint color. It’s the preferred condition for hero shots and marketing imagery. The challenge: light fades fast, so settings need adjusting every few minutes.
- Start at ISO 100, f/8, 1/250s
- As light drops, slow shutter first (down to 1/60s with a tripod), then open aperture
- Avoid raising ISO above 400, golden hour grain is more visible than midday grain
- White balance: Cloudy or Shade preset adds warmth without over-saturating paint.
Interior Photography
Interior shots fail more often than exteriors, mostly due to mixed light sources and spatial constraints. Ambient sunlight through windows mixes with incandescent interior lighting, causing color casts that turn cream leather orange and make dashboards appear jaundiced.
- Shoot from outside the car with doors open or windows down, wider framing, more natural light entry
- Set white balance to Auto; correct in post if color casts persist
- Aperture at f/4–f/5.6, tight cabin spaces don’t require f/11 depth of field
- ISO 400–800 is acceptable; beyond 800, noise becomes visible in dark headliners and carpet
- For tight detail shots (infotainment, stitching, controls): f/2.8, focus manually
Night Photography
Night photography requires a tripod, no exceptions. Long exposures at ISO 100 produce clean, dramatic images that no handheld night shot can replicate. This setup works especially well for luxury or performance vehicles positioned under controlled lighting.
- Tripod required: 30–60 second exposures
- ISO 100, the entire reason for long exposure is to keep ISO at baseline
- Aperture f/11, wide depth of field keeps all vehicle details sharp
- White balance: Auto, then adjust in post based on light source color temperature
- Use remote shutter release or 2-second timer to eliminate camera shake
For controlled indoor or studio environments, dedicated booths, staged backgrounds, a car photography turntable setup combined with consistent lighting produces the kind of 360-degree walkaround content that outperforms static photography on listing platforms.
#4- Lens Choice and Focal Length for Dealership Photography
Focal length changes how a car looks, not just what’s in frame. Wide angles (24–35mm) distort vehicle proportions. Long focal lengths (70–135mm) compress perspective and make vehicles look more imposing and proportional. For inventory photography, 50mm is the practical sweet spot.
| Focal Length | Best Use |
|---|---|
| 24–28mm | Environmental shots, tight spaces, full interior |
| 35mm | Tight exterior contexts; slight distortion acceptable |
| 50mm | Standard inventory listing, natural perspective, no distortion |
| 70–135mm | Hero / marketing shots, compresses proportions favorably |
| 200mm+ | Track / motion photography; not practical on dealership lots |
On smaller lots or indoor showrooms, 35mm is often the practical minimum. The critical rule: never use a focal length under 35mm for exterior listing shots, barrel distortion visibly stretches fenders and wheels in ways that reduce buyer confidence.
#5- iPhone vs. DSLR for Dealership Inventory Photos
Modern smartphone cameras have largely closed the gap with entry-level DSLRs in good outdoor light. The honest comparison for dealership operations in 2025 is more nuanced than “phone vs. camera”, it’s about which tool fits the workflow.
| Scenario | Better Choice |
|---|---|
| Bright outdoor daytime lot | Phone (iPhone 15 Pro / Pixel 9), comparable output |
| Overcast exterior | Phone or DSLR, both perform well |
| Indoor / low-light interior | DSLR / mirrorless, larger sensor handles noise better |
| Night photography | DSLR with tripod, long exposure not usable on phone |
| High-volume (50+ cars/week) | Phone, speed and workflow efficiency wins |
| Luxury / hero shots | DSLR, RAW latitude and lens control matter |
| Detail shots (stitching, badges) | DSLR, manual focus and aperture control |
For most independent and mid-size dealerships shooting on-lot in daytime conditions, a flagship smartphone produces listing-quality images. The investment that returns more than a camera upgrade: polarizing filter ($20–$40), consistent angle checklists, and AI post-processing to replace cluttered lot backgrounds.
#6- Lighting for Car Photography: What Settings Can’t Fix
Camera settings can optimize for available light. They cannot create good light. The single most common reason dealership inventory photos fail is shooting in the wrong light, not using the wrong settings.
- Harsh midday sun: Creates blown-out hoods, harsh windshield reflections, and deep shadow under the car. Avoid 11am–2pm on sunny days.
- Overcast cloud cover: Nature’s best diffuser. Even light, no harsh reflections, consistent color. Prioritize overcast windows when shooting full inventory.
- Open shade: Parking near a building that blocks direct sun produces clean, even-lit shots without requiring overcast conditions.
- Backlit: Shooting with the sun behind the vehicle creates dramatic silhouettes, intentional only, never for listing inventory.
The right car photography lighting approach eliminates most setting errors before you even pick up a camera.
The Real Cost of Manual Car Photography vs. AI-Powered Merchandising
Most dealers treat photography as a one-time cost. It isn’t. Every vehicle that sits unshot, sits in a post-production queue, or gets published with substandard images is accumulating a holding cost, roughly $40–$50 per car per day in floorplan interest, depreciation, and lost turn rate.
Here’s what the full manual workflow actually costs:
| Cost Component | Manual Photography | Spyne Studio AI |
| Photographer (per vehicle) | $15–$40/vehicle | Included in platform |
| Editing / background removal | $5–$15/vehicle | Automated |
| Time to publish after shoot | 24–72 hours | Under 1 hour |
| Reshoot rate (bad light, bad angles) | 15–25% of inventory | Near zero |
| Platform formatting (OEM portals, etc.) | Manual, per-platform | Automated |
| Holding cost per day offline | $40–$50/vehicle | Eliminated faster |
A mid-size dealership moving 80 units per month at $20–$55 per vehicle in photography and editing costs is spending $1,600–$4,400 monthly, before accounting for the 2–3 extra days a vehicle sits unpublished while it waits in an editing queue.
Spyne Studio AI collapses that workflow. Staff shoot on-lot with any device. The AI handles background removal, lighting correction, and platform formatting. Images go live the same day. At 80 units per month, getting each car published 2 days faster recovers $6,400–$8,000 in holding cost alone, a figure that dwarfs the platform cost in the first billing cycle.
Most Common Car Photography Mistakes (and How to Fix Them)
These are the errors that appear in dealership inventory photos daily, each one directly measurable in lower VDP engagement and longer days in stock.
Mistake 1: Too High ISO
Problem: Grain in paint, visible noise in dark interiors, loss of detail in shadowed areas.
Fix: Shoot in better light or slow shutter speed before raising ISO. ISO 400 is an acceptable ceiling for most exterior work. Above 800, reshoot.
Mistake 2: Blown-Out Highlights
Problem: White/silver paint loses all surface detail; windows become pure white; hood reflections burn out.
Fix: Expose -0.3 to -0.7 EV in bright conditions. Use RAW to recover highlights in post. Avoid shooting on reflective surfaces in direct sun.
Mistake 3: Inconsistent White Balance
Problem: Same car, same day, different photos, yellow cast in some, blue cast in others. Confuses buyers and looks unprofessional.
Fix: Set white balance to a fixed preset (Daylight or Cloudy) rather than Auto across a shoot. Adjust once in Lightroom if shooting RAW.
Mistake 4: Wrong Focal Length
Problem: Wide-angle photos of vehicles stretch the front bumper, distort wheel arches, and misrepresent proportions.
Fix: Never use focal lengths under 35mm for exterior listing shots. 50mm is the standard. Step back further and zoom in if needed.
Mistake 5: Inconsistent Angles Across Inventory
Problem: No standardized shot sequence means buyers can’t make like-for-like comparisons across listings. Builds distrust.
Fix: Adopt a fixed shot checklist: front 3/4, rear 3/4, driver profile, passenger profile, front-on, rear-on, interior front, interior rear, odometer, engine bay. Every vehicle, every time.
Manual Photography vs. AI-Powered Automotive Photography
Manual photography gives operators precise control over the image, the right settings, the right light, the right angle. It also requires trained staff, consistent execution, time, and a reliable post-processing workflow. For high-volume inventory operations, those requirements compound fast.
| Manual Photo Workflow | AI-Powered Studio Workflow |
|---|---|
| Requires trained photographer | Any lot staff can shoot; AI handles post-processing |
| Post-processing queue adds 24–48 hours | Images processed in minutes, published same day |
| Background quality depends on lot conditions | Professional studio backdrop applied automatically |
| Inconsistent output across staff | Consistent output across all vehicles, all staff |
| Retouching is manual, skilled, and expensive | Background removal and enhancement automated |
| OEM portal compliance requires specialist knowledge | AI applies platform-specific format requirements |
AI automotive photography isn’t about replacing the photographer, it’s about removing the post-production bottleneck. Dealers using tools like virtual car photography studio platforms can get cars listed 3–4 days faster than manual workflows allow. At $46/car/day in holding cost, that math adds up quickly.
How Does Spyne Studio AI Turn On-Lot Photos Into Publish-Ready Inventory?
Getting camera settings right is half the workflow. The other half is what happens after the shutter closes: background removal, lighting correction, platform formatting, and publishing. For dealers running 50 to 500 vehicles through inventory at a time, that post-processing layer is where manual workflows break down.
Spyne Studio AI is built specifically for automotive dealership operations. It handles the full pipeline from raw on-lot photo to published, platform-ready listing image, without a professional photographer, without a post-production team, and without a 48-hour editing queue.
What it does in practice:
- Background replacement: Removes cluttered lot environments and applies clean, studio-quality backdrops automatically.
- Lighting correction: Corrects for inconsistent natural light across a shooting session, overcast, harsh sun, shadows.
- Platform publishing: Formats and publishes directly to dealership websites, AutoTrader, Cars.com, OEM portals in one click.
- Consistency at scale: Every vehicle in inventory receives the same visual treatment, regardless of which staff member shoots it.
- Speed to market: Top-performing dealers get cars live in 3 days. Studio AI makes that standard, not exceptional.

Closing Thoughts
Camera settings are the foundation of dealership inventory photography, not the ceiling. Getting ISO, aperture, and shutter speed right prevents the errors that kill buyer confidence before they read a single line of copy. Consistent angles, correct white balance, and disciplined shooting conditions do the rest.
But for most dealerships, the limiting factor isn’t how well staff can operate a camera. It’s the time and expertise required to process, edit, and publish those photos at scale, consistently, for every vehicle in a rotating inventory. That’s the gap between a 3-day frontline standard and a 7-day one, and it’s measurable in holding costs, VDP traffic, and lead volume.
Spyne Studio AI closes that gap. Whether your team shoots with a DSLR or a flagship smartphone, Studio AI transforms on-lot images into studio-quality, platform-ready listings in minutes. Backgrounds, lighting, and platform formatting, handled automatically. Your team shoots; the AI publishes. Book a Demo to see how Spyne Studio AI works on your inventory.