
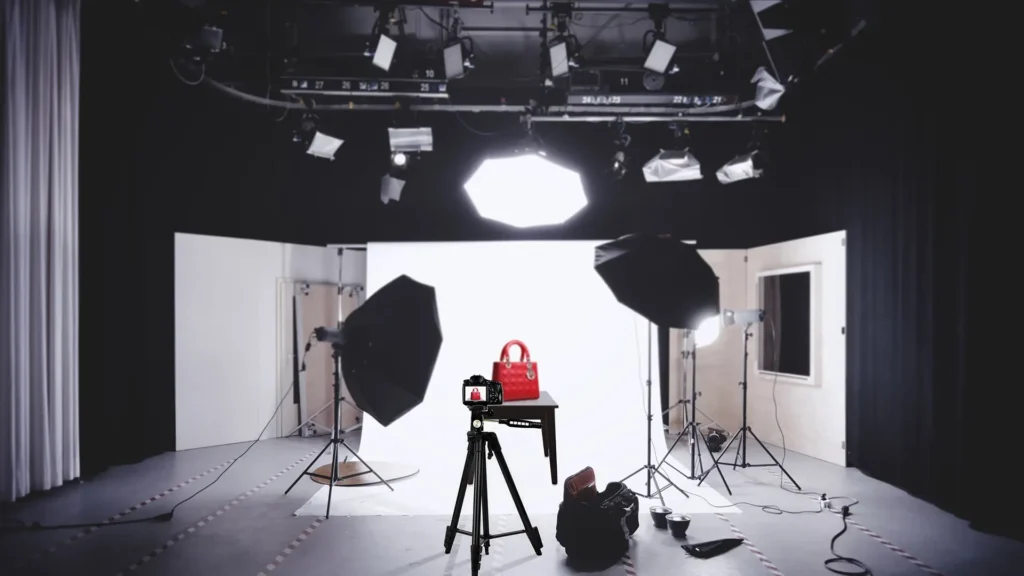
Product photography is an essential aspect of e-commerce and product marketing. High-quality product images can significantly impact a customer’s buying decision. To capture professional-looking product photographs, having a proper photography setup is crucial. A product photography setup consists of a range of equipment and tools that help achieve the desired results. This includes cameras, lenses, lighting, backdrops, props, and various other accessories.
Product photography can be daunting for beginners, as it involves understanding technical aspects such as aperture, shutter speed, and ISO settings. However, with the right guidance and knowledge, anyone can set up a professional-looking product photoshoot setup.
Here, we will discuss in detail the benefits, strategies, and process of creating a product photography setup at home to deliver high-quality results.
What is a Product Photography Setup?
A product photography setup refers to the combination of equipment and tools used to capture high-quality images. This setup can vary depending on the product being photographed, the desired outcome, and the budget allocated for the photoshoot. A typical setup includes a camera, lens, lighting, backdrops, and various other accessories. A product photoshoot setup is designed to create a professional-looking image that accurately represents the product and highlights its unique features.
The setup is an essential aspect of ecommerce product photography and product marketing, as high-quality images can significantly impact a customer’s buying decision.

Why you need High-Quality Product Images
1. Product photography quality reflects the brand image
Investing in a Product Photography kit can yield long-term benefits for your business. Professional product images convey a sense of professionalism, value, creativity, and innovation to customers. This can build trust and loyalty, as customers feel that their needs are being met. By demonstrating the quality of your products, and the credibility of your brand image, professional product photography can encourage repeat purchases and generate positive reviews.
2. Photos influence purchasing decisions
Visual media has a unique power to create initial impressions since human beings are naturally inclined towards visual stimuli. A great product image can be more effective than written content and can lead to more website traffic and conversions. Given the digital landscape we operate in, customers tend to have shorter attention spans, making it essential to have compelling photographs to capture their attention.
3. Product photography showcases the skill
You need product photography techniques and professional equipment to capture visually appealing images. The resulting photos require Product Photo Editing and retouching to enhance their visual impact. A skilled and experienced product photographer should know how to utilize quality cameras, backdrops, and product photography lighting techniques to create powerful images.
4. Images increase engagement
Effective product photography captures attention instantly, resonating with the audience in terms of image quality, subject, colors, and concept. Professional images are a key tool in building long-term customer relationships, demonstrating attention to detail, and setting your brand apart from competitors. In addition to online marketing, professional product images can be utilized for offline advertising through banners, flyers, and other promotional materials. In a retail setting, high-quality product images can be used in a window display to attract potential customers passing by and entice them to visit your store.
5. Use images to tell a story
Professional product photos that accurately represent your products can help meet customer expectations and eliminate doubts regarding the quality of your products. Investing in high-quality product images can inspire your audience to purchase your products and significantly impact your brand. Consider the potential impact of utilizing professional product photography to its fullest and how it can make a big difference in your business.
How to Take Product Photos that Set You Apart
Anywhere you look, you will find product images, whether scrolling on the web, scanning through brochures and magazines, or driving by billboards and pamphlets. Product photography is everywhere because businesses realize its importance for selling products. They are crucial in defining a brand and converting leads to sales.
If you are looking for a camera online, and visit a website to buy one, find a detailed description, and glowing reviews, but no images. Would you make that purchase? Chances are – no.
This is because product photography is proof of the detailed description you write. Most shoppers look at images before going to the description. With just an image, the customer knows the shape, size, color, and usage of the product.
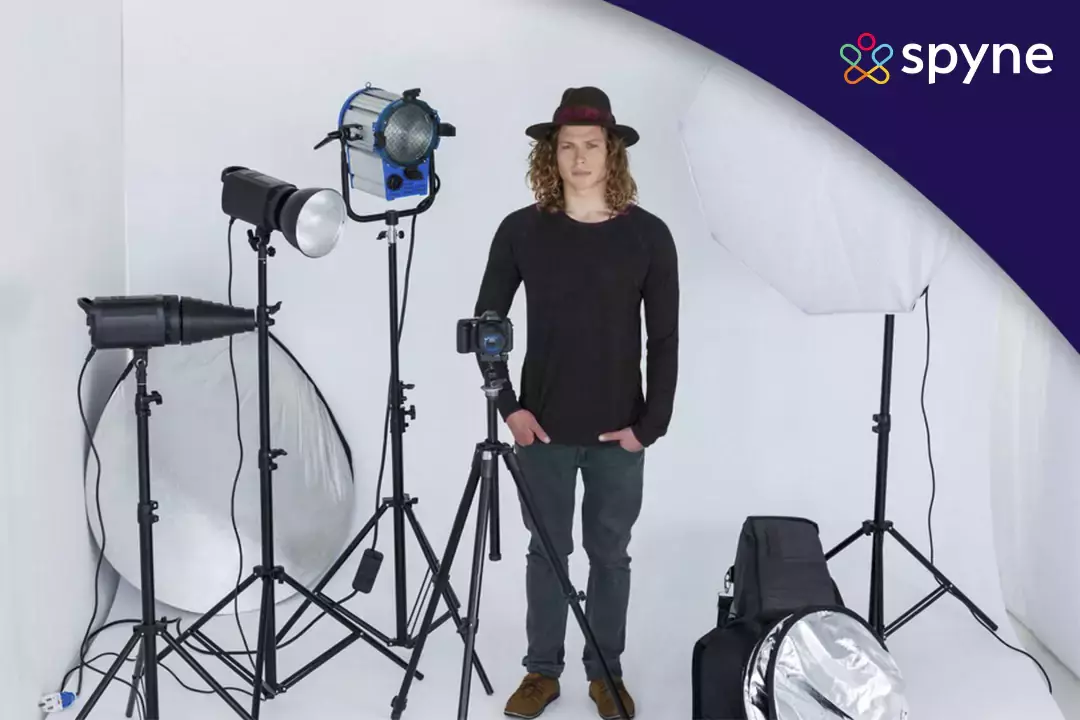
Essentials for the Perfect Product Photography Setup
1. Product Photography Gear
Product photography gear is a crucial component of a perfect product photography setup. A quality camera with interchangeable lenses is a must-have, as it allows for flexibility in capturing different angles and perspectives of your products. Lighting equipment, including softboxes and reflectors, is needed for even lighting and minimizing shadows. A tripod helps stabilize the camera and ensures consistent framing and focus. A white backdrop or a lightbox provides a neutral background to highlight the product and remove distractions. Other accessories, such as remote shutter release, memory cards, and backup batteries, help ensure a smooth and successful photoshoot.
2. Product Photography Camera Settings
Camera setting for product photography is crucial for capturing high-quality images. Shooting in manual mode allows you to control the aperture, shutter speed, and ISO, providing greater flexibility in adjusting the exposure and depth of field. A wide aperture (lower f-stop number) creates Isolation of the subject by a shallow depth of field, which can create a more visually appealing image. Using a low ISO setting minimizes digital noise and maintains image clarity. RAW format captures more image data, providing greater flexibility in post-processing. Other settings, such as white balance and focus mode, should also be carefully considered to ensure accurate color representation and sharpness.
3. Product Photography Lighting Setup
A well-executed lighting setup is crucial for producing high-quality product photography. The three key elements of lighting setup are the main light, the fill light, and the background light. The main light illuminates the subject, while the fill light helps balance the shadows and highlight details. The background light is used to create separation between the subject and the background. Light modifiers, such as softboxes, umbrellas, and reflectors, can help control the direction and intensity of the light.
4. Post-Production and Editing solutions
The images captured during the shoot often need to be retouched, adjusted for color accuracy, and optimized for web use. Post-production involves various techniques, such as removing blemishes, correcting exposure, adjusting contrast, and sharpening details. Image editing software, such as Spyne, Adobe Photoshop, or Lightroom, can help achieve the desired results. Additionally, batch processing tools can be used to speed up the editing process for large sets of images. Proper post-production and editing can enhance the visual appeal of the product images, making them more attractive and effective for marketing and sales purposes.
DIY Product Photography Setup
To create a DIY product photography studio setup, you’ll need a few essential items. Firstly, find a spacious area where you can set up a table with ample room to move around. Next, choose a light source, preferably a large window with indirect sunlight. If this isn’t available, you can use small lamps or invest in off-camera flashes and strobes.
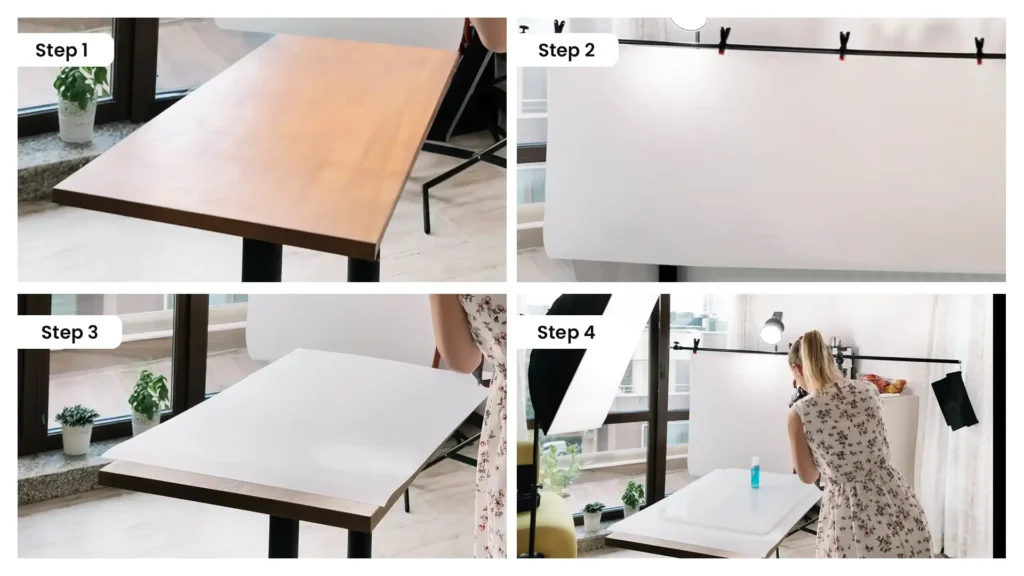
A seamless white paper backdrop wider than your largest product, a folding table, clamps, and duct tape is also necessary. Additionally, a whiteboard and an entry-level DSLR or mirrorless camera with a tall tripod are crucial for capturing high-quality product photos.
Now that you know what equipment to gather, let’s look at the step-by-step process of DIY photography setup
Step 1: Setting up the table
The foundation of every Product Photography Studio is the product’s placement. It’s important to position the table near a window to take advantage of the natural light that comes in. The table should be set up in a way that allows you to shoot in parallel with the window. This means that when you’re taking photos of the product, the light from the window should be hitting it from the side.
Step 2: Setting up the backdrop
Securely attach the seamless paper to the ceiling with duct tape and clamp it to the table to serve as your backdrop. Ensure that the paper is positioned behind the area where your subject will be placed. Roll out approximately 10 feet of paper, then start by attaching the top of the paper to the ceiling using duct tape. Let it hang down onto the table and clamp it down securely. The paper should curve underneath your product, stretch across the table, and then hang down to the floor.
Step 3: Placing the whiteboard
The purpose of the whiteboard is to serve as a reflector and provide additional light to the opposite side of your product. To achieve this, position the whiteboard next to the window, opposite the spot where your product will be placed. The board should be larger than your biggest product to ensure maximum effect. To hold up the whiteboard, use flat bookends or create your own support.
Step 4: Placing the product
Finally, it’s time to position your product. Before taking any shots, ensure that you clean your product meticulously, removing any dirt, grime, or blemishes. Place your product between the window and the reflector, ensuring that both sides are well-lit. Next, set up your tripod and camera, and start capturing those perfect shots!
Product Photography Composition – Important Tips
Tip 1: Using front and central placement
The general rules of composition can be effective when used appropriately, but in product photography, it’s often necessary to disregard them and place the product front and center. This draws the viewer’s attention directly to the item with no distractions. Positioning the product in the foreground or middle ground can add depth to the image, utilizing negative space to enhance the composition. Depth can be achieved through lighting, color contrast, and reflections, avoiding a flat and uninteresting image.
Tip 2: Choosing camera angles
In product photography, camera angles can create interest and make the product seem more realistic. The 45-degree downward glance is a popular technique that mimics how we look at objects on tables and shelves, giving the impression that the viewer already owns it. Choosing the right camera angle can also add depth and showcase the product’s features. A straight-on or top-down perspective may not capture all of the product’s details. To create the best product images, it’s important to experiment with different camera angles and choose the one that highlights the product’s best features.
Tip 3: Using negative Space
Utilizing negative space helps to draw the viewer’s attention to the product in the image. It also provides breathing room, making the photo more aesthetically pleasing. Another advantage of leaving negative space is that it provides room to add text to the image. This is particularly useful when creating advertisements. You can easily add text in post-production without cluttering the image, making it more visually appealing.
However, it’s important to use negative space effectively. Avoid overcomplicating the composition and ensure that it looks natural. Observe how professionals use negative space in their work by studying billboards and other advertising media.
Tip 4: Applying the rule of odds
The rule of odds captures viewers’ attention on a subconscious level. This rule states that even numbers of objects in an image can feel dull and predictable, while odd numbers create a sense of tension and interest.
To apply this product photography technique, you can place additional objects in the scene to accompany the main product. For example, a shaving foam product can be paired with a towel and a razor. Remember to ensure that the additional objects do not detract from the main product and that the composition remains balanced.
Tip 5: Rule of thirds
Most photographers learn a basic principle when they start learning about photography. It involves placing the subject of a photo on the intersections of horizontal and vertical lines, instead of in the center of the frame. To apply the rule of thirds, divide the frame into three equal columns and three rows, and the intersections appear where these lines meet.
In product photography, the rule of thirds helps to create a more dynamic and visually appealing composition. By placing the product on one of the intersections, the viewer’s eyes are drawn to it, and the image becomes more engaging.
Tip 6: Applying differential focus
The technique of differential focus involves selecting which part of an image should be in focus and which part should be blurred. In product photography, you can use this technique to bring attention to the product in the foreground while blurring the background. By carefully considering the product’s placement, setting, and scene dressing, you can convey a compelling story that goes beyond a simple shot of the item.
Tip 7: Using dynamic diagonals
The dynamic diagonal compositional technique involves either arranging or photographing your product with lines in mind. Lines are the strongest elements of design. They can be used to bring the product to the attention of the potential buyer. Placing the products along diagonal lines will enhance the importance of the product (Diagonal Rule). These diagonals help in diverting the attention of the customers to the product.
Tip 8: Using a top-down perspective
Using a top-down or flat-lay perspective can be a useful technique to showcase your products in a distinctive way. This viewpoint provides a different angle of the product than the usual 45-degree or straight-on view, making it look more intriguing and captivating. This perspective is commonly used in food photography, where the flat space allows for creative arrangements of additional items, creating a narrative rather than a simple image.
Conclusion
A successful product photography setup requires attention to detail and creativity. From lighting and camera angles to composition and storytelling, every element plays a crucial role in showcasing your product in the best possible way. It is essential to clean and position your product correctly, use negative space, and experiment with different camera angles and perspectives.
Following compositional techniques such as the rule of thirds, rule of odds, and differential focus can add depth and interest to your images. Remember that product photography is about selling a lifestyle, not just an item, so make sure to create a story through your setting and props. By combining technical skill and artistic vision, you can create stunning product photos that grab attention and increase sales.
Spyne is an AI-based photo editing platform that can enhance your product photography by providing advanced editing tools that improve image quality, remove unwanted objects, and adjust lighting and color. It can also provide automated Product background removal, saving time and effort for photographers.