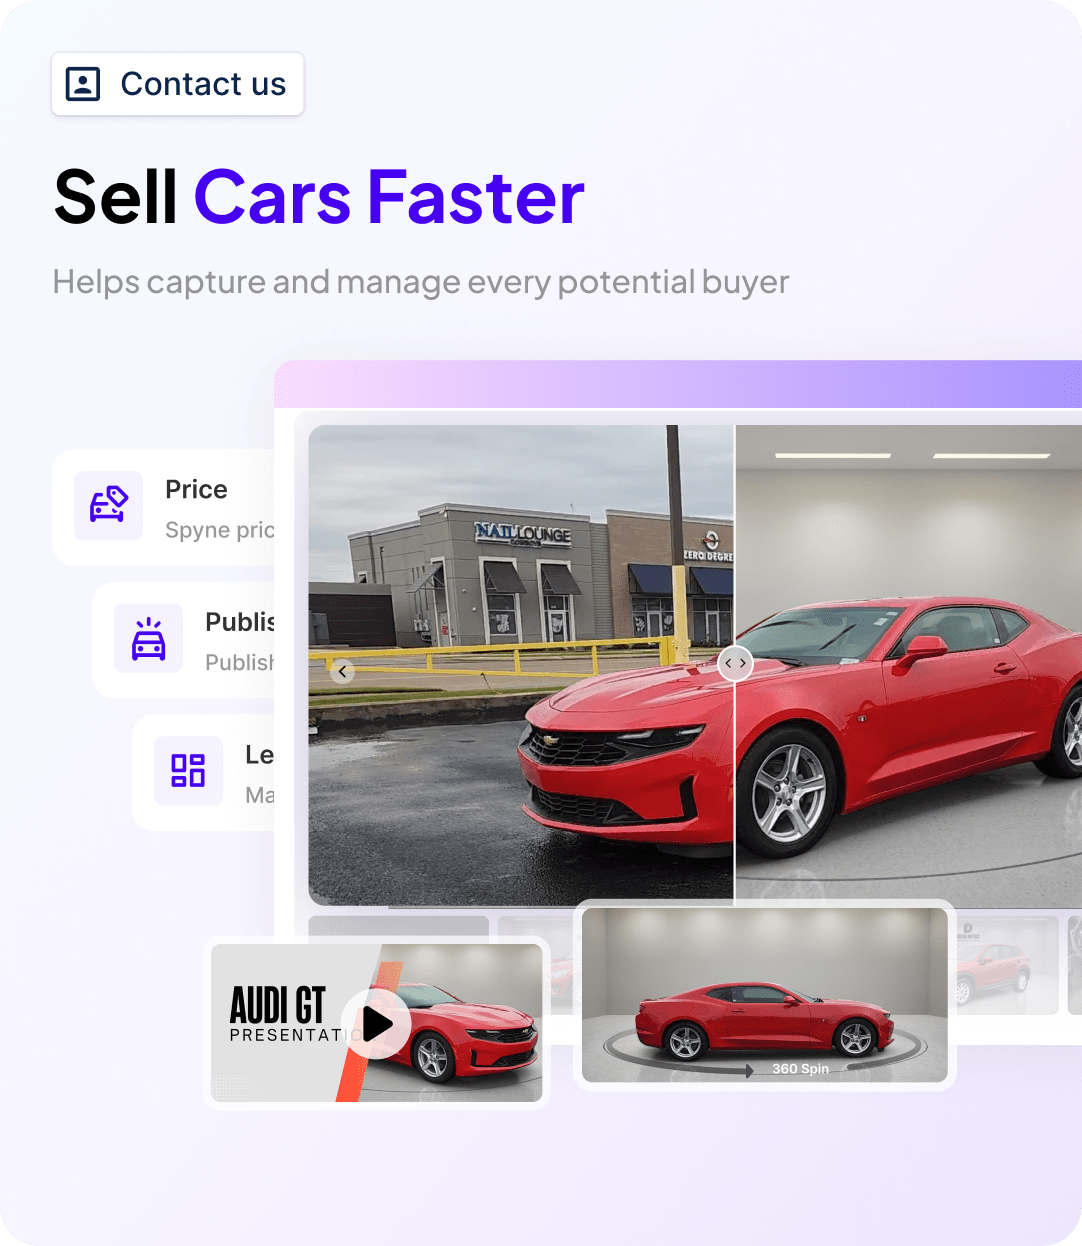

Why do two identical vehicles, same model and made, in a digital catalog, get wildly different traction?
The deciding factor, more often than not, is the photograph. With 2x as many consumers now starting their vehicle research online than at dealerships, digital merchandising, especially car photography, has become the first buyer filter.
Industry data shows that listings with multiple custom images, rather than a single stock photo, see a 133% higher click-through rate for new-car VDPs, and an even more dramatic 349% boost for used or CPO listings. In short, better car imagery directly drives your lead funnel.
But here’s the real bottleneck for most car dealerships is consistency at scale. Managing hundreds of listings across varying light conditions, camera settings, and photographer skill levels makes uniform quality nearly impossible.
This guide doesn’t rehash the usual “best car photography angles and tips” advice. It reframes car photo angles as a strategic merchandising framework as a strategic solution to that challenge and how AI-driven platforms can deliver studio-quality, and standardized results.
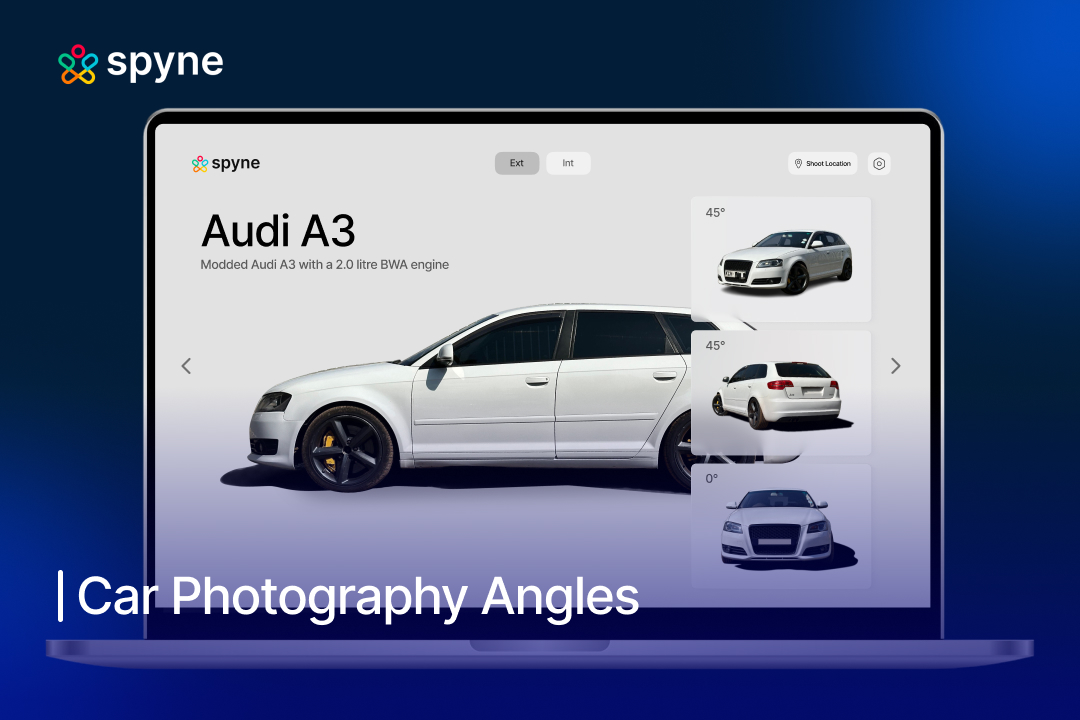
Top 10 Car Photography Angles and Tips
All major angles for car photography are thoughtfully designed to showcase a vehicle’s unique character like its stance, silhouette, interiors , finer design details etc. Here’s a car photography guide breaking down the best car photo angles, along with how to shoot tips and their use cases.
1. Front ¾ (Hero Angle)

The front ¾ angle is often called the hero shot in automotive photography, and for good reason. In car merchandising, it’s this angle that delivers the most complete visual story in a single frame, thus capturing the car’s face, side profile, and stance together. Car photographers often treat this as a “three-dimensional handshake”, the shot that welcomes buyers in.
How to Shoot the Front ¾ Angle
- Turn Wheels Outward: Rotate the front wheels outward about 15–20° to reveal the rims and add dynamic depth to the shot.
- Shoot from Hubcap Height: Position the camera level with the wheel hub to preserve proportional accuracy and prevent distortion from high or low angles.
- Use a Mid-Range Lens: A 35–70mm focal length captures natural depth while avoiding the exaggerated warping common with wide-angle lenses.
- Leverage Golden Hour Light: Soft, directional light during early morning or late afternoon sculpts body curves, enhances paintwork, and minimizes harsh reflections.
- Maintain a Clean Background: Select uncluttered surroundings or use a shallow depth of field to ensure the car remains the dominant subject in the frame.
Use Cases:
- Widely used in print ads and auto magazines to showcase design in a single, comprehensive frame.
- Popular choice for social media thumbnails, where it quickly grabs attention and drives clicks.
- Ideal as the cover image in online listings, giving buyers the clearest first impression.
A study found that listings with 40+ photos attract about 65% more VDP (vehicle detail page) views, underscoring the value of robust visual storytelling.
2. Rear ¾ View
One of the best car photography angles, the rear ¾ car shot complements the hero shot by highlighting tail-light signatures, spoilers, bumper sculpting, and stance. It is an indispensable part of any car photoshoot, especially for modern EVs and SUVs, where distinctive rear styling plays a big role in brand identity. The rear ¾ shot, typically placed third or fourth in a gallery, reassures buyers they’ve seen the car “all around,” making them less hesitant to inquire or book a test drive.
How to Shoot the Rear ¾ Angle
- Position the Camera at Hubcap Height: Shooting level with the wheel hub ensures natural proportions and emphasizes stance, while avoiding distortion from high or overhead angles.
- Angle From the Rear Corner: Place the camera diagonally behind the car, showing both the rear fascia and a portion of the side profile for depth.
- Use a Moderate Telephoto Lens (50–85mm): This range maintains realistic lines and compresses the car’s depth slightly, preventing the rear from looking oversized compared to the side.
- Control Lighting for Rear Details: Side or backlighting during golden hour enhances curves, taillights, and spoilers. If shooting at dusk, switch on taillights to highlight LED or light-bar designs.
- Mind Rear Reflections: The rear glass and glossy bumper often pick up strong reflections; use a circular polarizer or adjust shooting position to reduce glare.
- Highlight Key Design Cues: Make sure taillights, exhaust tips, diffuser, or badging remain sharp and in focus as these are high-interest areas for car buyers.
Use Cases:
- Completes the full 360° impression in online listings, reassuring buyers they’ve seen all critical design angles.
- Showcases distinctive taillight signatures and aerodynamic styling, especially for EVs and performance cars.
- Valuable in ads and social content where the “drive-away” angle creates a lasting visual impression.
3. Full Side Profile
The full side profile is the most straightforward yet informative angle in car photography. One of those car photography angles, that offers a clear look at the vehicle’s proportions, body length, roofline, and wheel-to-body ratio. For SUVs, the side view shows the ground clearance and hence its practicality, while for sedans or coupes, it showcases its aerodynamics.
How to Shoot the Full Side Profile:
- Position the Camera at 90°: Shoot perfectly perpendicular to the car for clean, distortion-free lines.
- Keep the Wheels Straight: Unlike angled shots, the side profile should show symmetry, straight wheels maintain a neat silhouette.
- Shoot at Mid-Height: Place the camera at window or hubcap level to preserve natural proportions without exaggerating ground clearance.
- Use a Longer Focal Length (70–100mm): Stepping back and zooming in prevents warping and ensures the car looks true-to-scale.
- Mind Reflections on Doors and Panels: Use soft lighting or a polarizer to avoid distracting glares across the long body surfaces.
Use Cases:
- Essential in listings to showcase size, door layout, and proportions clearly.
- Valuable in brochures and comparison tools where buyers study length and styling side by side.
- Helpful for highlighting wheels, trims, and ground clearance differences across variants.
4. Full Front & Rear

The full front and rear views are among the most essential perspectives in car photography because they present the vehicle in its purest, most recognizable form. Shot straight-on and perfectly centered, these car photography angles emphasize the grille, headlights, taillights, and brand badging, details that buyers instinctively look for when identifying a model.
How to Shoot the Full Front & Rear:
- Highlight Symmetry: Ensure the car appears evenly framed with both headlights/taillights visible and balanced. This reinforces the design’s geometry and brand identity.
- Showcase Signature Details: Make the grille, headlights, taillights, and logo stand out clearly, these are the visual cues buyers use to recognize models and trims instantly.
- Keep the Stance Natural: Present the car as it looks on the road, with alignment and a level horizon, so buyers can picture real-world presence.
- Use Clean Surroundings: A neutral, uncluttered backdrop directs attention to the front or rear design rather than the environment.
- Reveal Authentic Condition: Let the shot clearly show the condition of lights, bumpers, and body panels, some areas buyers scrutinize most when checking wear and authenticity.
Use Cases:
- Essential for online listings where buyers validate authenticity, condition, and design.
- Mandatory for marketplace compliance, as many platforms require a clear front and rear shot for fraud prevention.
- Valuable in brochures, catalogs, and marketing campaigns where front or rear styling is often used to differentiate trims or highlight brand identity.
5. Low and High Perspectives
Low & high perspectives give viewers a fresh look at a car, moving away from eye-level shots that dominate most listings. A low car photography angle shot can emphasize wheels, stance, and ground clearance, while also making the car look sleek, straight or sportier. On the other hand, a high-angle shot provides context by showing the roofline, proportions, and surrounding environment, which helps highlight practicality and overall shape.
How to Shoot the Low & High Angles:
- For low angle shots, position your camera close to the ground (ankle to knee height) to accentuate the car’s stance.
- Keep the camera parallel to the car’s body to avoid warped proportions
- Frame the shot so wheels, grille, and ground clearance are clearly visible.
- For high angle shots, try elevating your position using a step stool, ladder, drone, or extended monopod.
- Angle the camera slightly downward to capture the roofline and overall silhouette.
Use Cases:
- Ideal for lifestyle campaigns and social media creatives where dramatic perspectives spark curiosity and encourage higher engagement.
- Practical for highlighting unique features such as roof rails, sunroofs, custom wheels, or ground clearance that aren’t as visible from standard eye-level shots.
- Effective in press kits, automotive blogs, and editorial spreads where fresh, unconventional viewpoints add depth to storytelling and brand positioning.
6. Interior and Dashboard
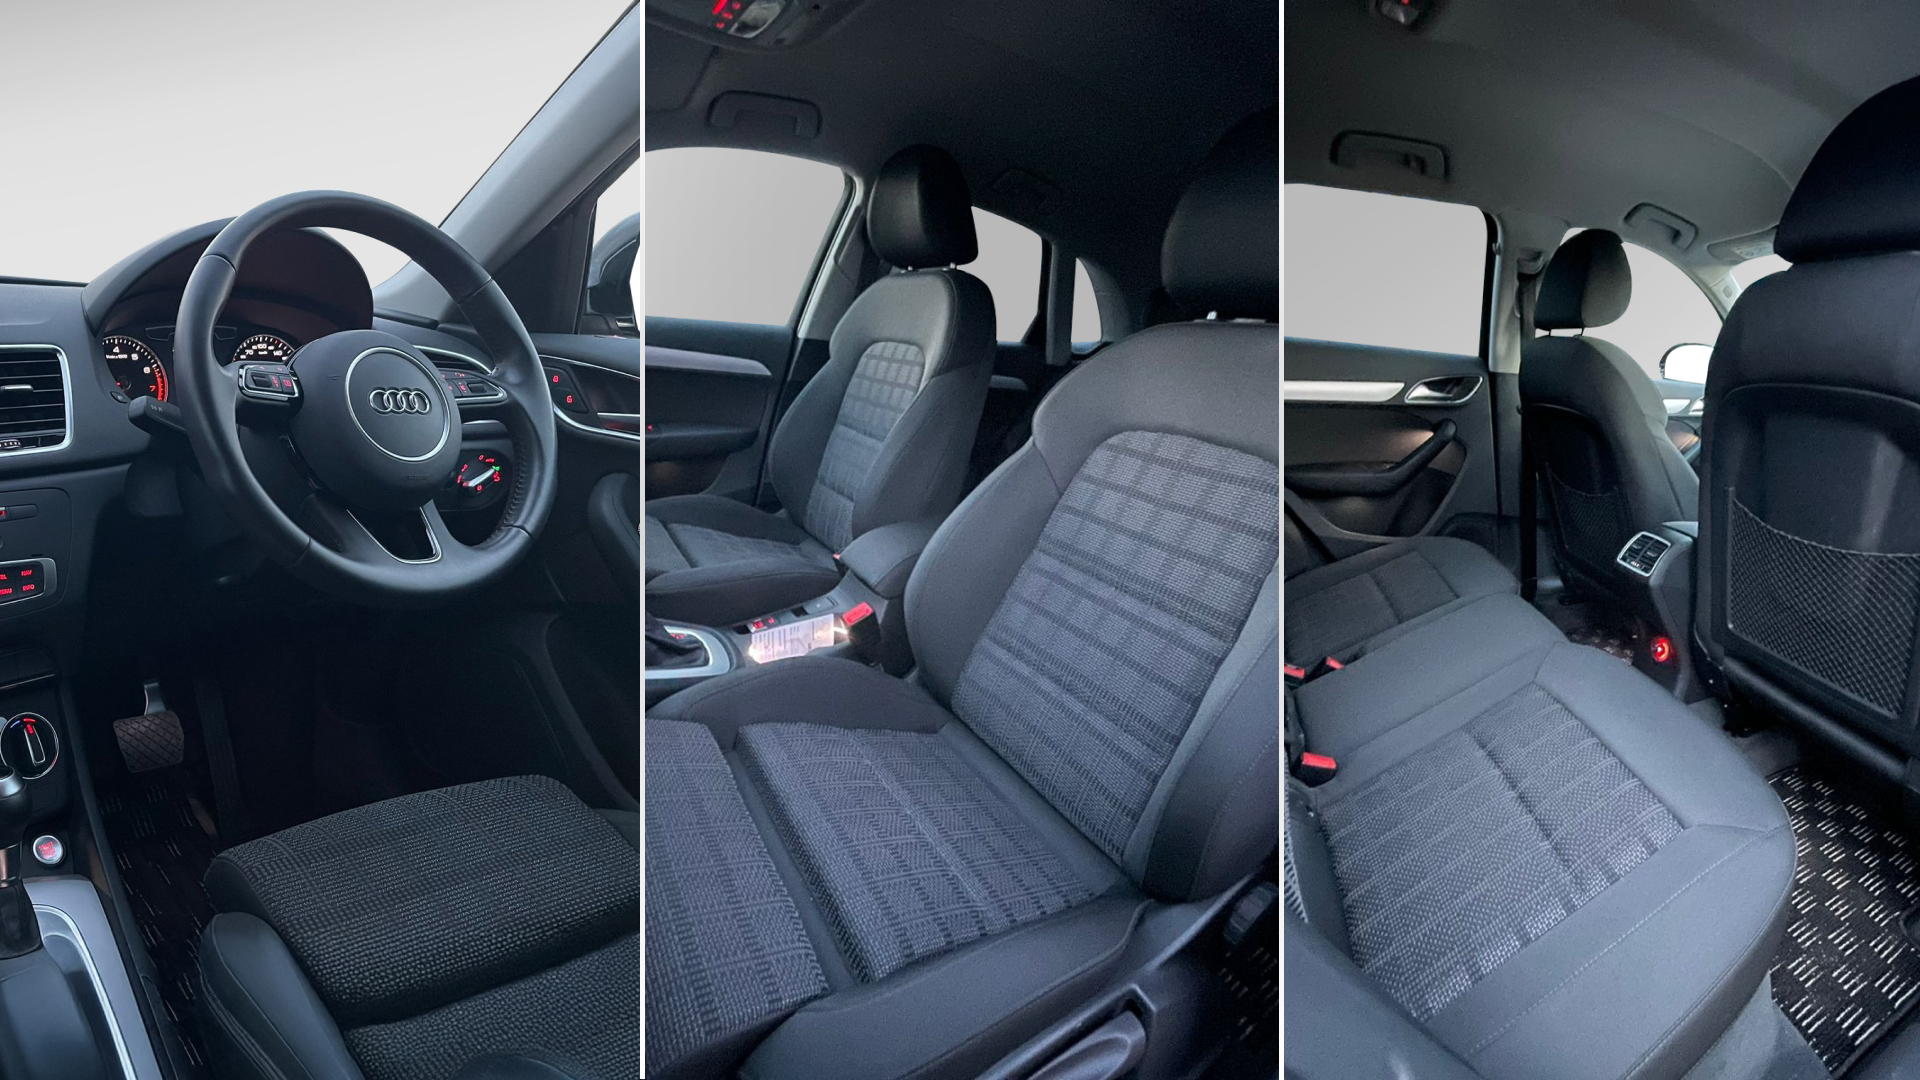
The interior & dashboard are those angles for car photography that go beyond aesthetics and focus on showcasing comfort, features, and technology. This car photo angle gives potential buyers a feel of the car’s environment before they even step inside. Whether it’s the leather finish, infotainment screen, or ambient lighting, a well-composed dashboard shot highlights the driving experience, making it just as important as the exterior views.
How to Shoot the Interior & Dashboard:
- Capture the Full Layout: Use a wide-angle lens to frame the steering wheel, dashboard, and front seats together, giving a true sense of space.
- Highlight Key Features: Focus on tech and design elements buyers look for first, infotainment screen, steering controls, gear shifter, and upholstery finishes.
- Control Reflections & Glare: Position the camera to avoid light bouncing off the windshield or glossy surfaces that can obscure details.
- Keep it Spotless: Ensure the dashboard, console, and seats are clean and clutter-free to enhance the premium feel.
- Balance Natural & Ambient Light: Combine daylight with interior lighting or ambient glows to bring out textures and screen clarity without overexposure.
Use Cases:
- Crucial for online car listings and dealership websites where buyers want to evaluate comfort, infotainment, and build quality before visiting in person.
- Valuable in brochures, catalogs, and premium campaigns that emphasize luxury trims, advanced tech features, or custom interiors.
- Widely used in press kits, automotive reviews, and blogs where highlighting detailed dashboard imagery is needed.
7. Engine Bay
The engine bay shot provides a clear view of the car’s mechanical heart, the engine and surrounding components. Buyers, especially enthusiasts and used-car shoppers, often look at this angle to assess the car’s condition, cleanliness, and maintenance level. For new models, manufacturers and dealers use this shot to highlight engineering precision, build quality, and any unique powertrain features.
How to Shoot the Angle:
- Open Hood Fully: Ensure the hood is lifted completely and securely, avoiding shadows that may hide details.
- Clean the Bay: Wipe down surfaces to remove dust, oil, or debris, a clean engine bay instantly communicates care and reliability.
- Use Even Lighting: Avoid harsh overhead light; soft, diffused lighting ensures wiring, covers, and engine parts are clearly visible.
- Shoot Straight On: Position the camera directly above or slightly angled from the front for a comprehensive view without distortion.
- Highlight Details: Capture close-up secondary shots of unique features (e.g., hybrid systems, performance branding, or aftermarket upgrades).
Use Cases
- Essential for used-car listings where buyers judge maintenance and authenticity.
- Important for premium and performance vehicles, where engine design and branding are part of the appeal.
- Useful in brochures and marketing, highlighting technology like hybrid systems, turbochargers, or electric motors.
- Valued by enthusiasts and collectors documenting originality, modifications, or restorations.
8. Detail Close-Ups
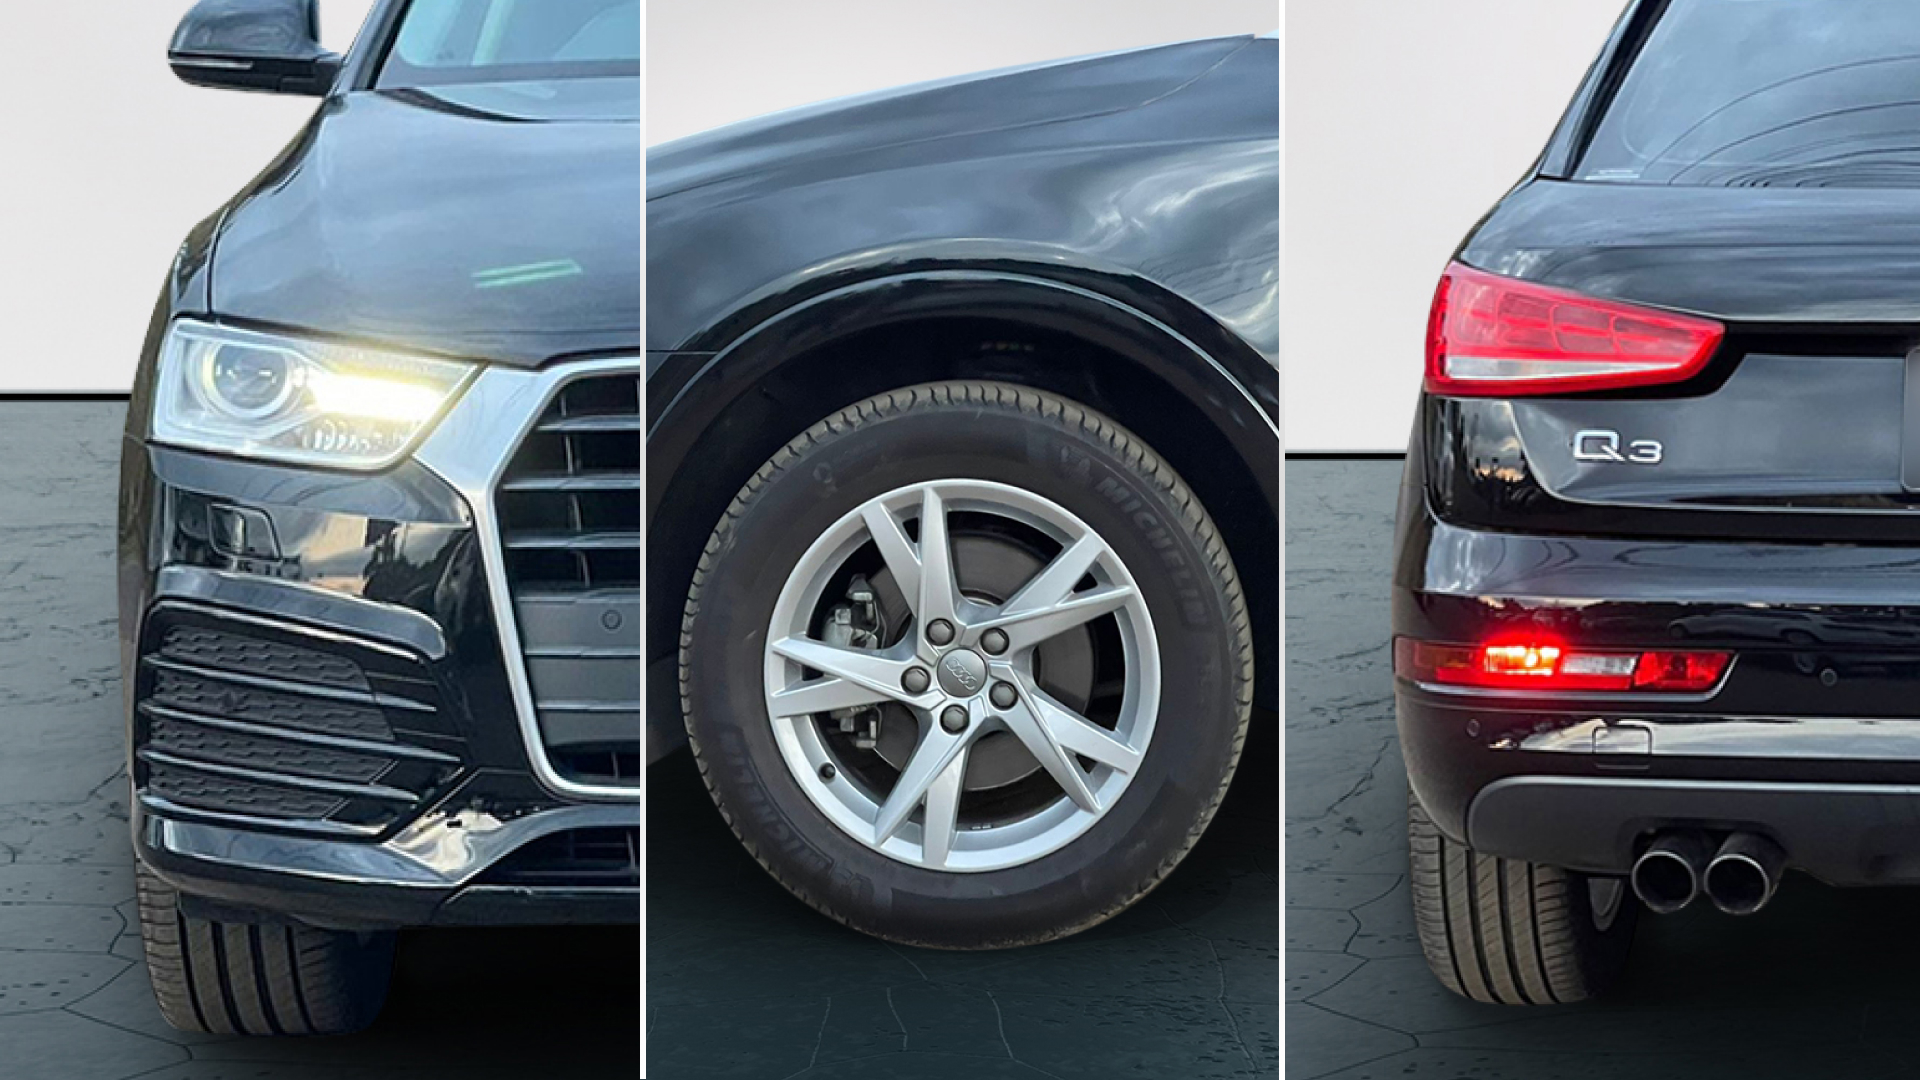
Car photography angles like detailed close-up shots spotlight the finer elements of a car’s design like the intricacy of headlight clusters and alloy wheel patterns to the precision stitching on seats or the finish of a textured dashboard. Unlike wide-angle views, detail shots allow buyers to appreciate features that often get overlooked but play a big role in shaping perception of luxury, style, and authenticity.
How to Shoot:
- Use a Macro or Zoom Lens: Switch to a lens that allows you to capture intricate textures and small design cues with clarity.
- Focus on Brand Markers: Frame iconic details like the emblem, headlamp design, or wheel spokes, as these elements strongly influence buyer perception.
- Highlight Material Quality: Capture stitching, chrome accents, or unique textures under good lighting to emphasize premium feel.
- Control Reflections: Adjust angle or use polarizing filters to minimize unwanted glare, especially on glossy surfaces.
- Maintain Context: Even in close-ups, leave enough framing to suggest which part of the car the detail belongs to.
Use Cases:
- Ideal for marketing campaigns where craftsmanship and premium features need highlighting.
- Valuable in online listings to prove authenticity (e.g., showing VIN plates, logo engravings).
- Commonly used in social media content, where small but eye-catching details perform well in car enthusiasts’ communities.
- Useful in press or brochure photography to emphasize signature styling elements.
9. Motion Shots (Panning & Rolling)
Motion shots inject energy and realism into car photography by capturing the vehicle in motion. Panning shots, in particular, keep the car crisp while artistically blurring the background, evoking speed and excitement even at low driving velocities. One of the best angles to photograph a car, this angle adds life to the image, portraying how the car looks and feels on the road, and helps potential buyers visualize its performance.
How to Shoot Motion Shots
- Use Slower Shutter Speeds: For panning, set the shutter speed around 1/30–1/60 sec to keep the car sharp while the background blurs.
- Steady Panning Technique: Follow the car smoothly with your camera movement, keeping it aligned within the frame as you click.
- For Rolling Shots: Shoot from a tracking vehicle at a matching speed; use wide to mid focal lengths (24–70mm) for balanced perspective.
- Safety First: Ensure both cars are driven in controlled, safe conditions, preferably on empty roads or designated tracks.
- Leverage Angles: Capture from low or ¾ rolling views for a more cinematic effect, highlighting both motion and design lines.
Use Cases
- Ideal for marketing campaigns to showcase performance and driving appeal.
- Effective in social media ads, where dynamic imagery grabs attention instantly.
- Useful for editorial and lifestyle shoots, linking the car’s design to real-world driving experiences.
- Adds value in brand storytelling, showing not just how a car looks but how it moves.
10. Creative & Contextual Angles
Creative and contextual shots go beyond standard documentation to tell a story around the car. These include framing the vehicle with dramatic reflections, shooting through objects (like windows, foliage, or architecture), using unique perspectives (overhead, tilted, or abstract close-ups), or placing the car in a setting that highlights its purpose, such as an SUV on rugged terrain or a luxury sedan in an urban skyline.
How to Shoot Creative & Contextual Angles
- Experiment with Framing: Use natural or architectural elements to add depth, leading lines, or reflections that enhance composition.
- Play with Light & Shadows: Golden hour, neon lighting, or even silhouettes can transform the mood of the shot.
- Choose a Relevant Backdrop: Match the car to its intended identity, performance cars on winding roads, EVs in modern cityscapes, off-roaders in natural landscapes.
- Try Unconventional Angles: Shoot from overhead drones, extreme low perspectives, or inside-out (through the windshield or side mirrors) for storytelling impact.
Use Cases
- Perfect for advertising campaigns and special editions where storytelling is as important as showcasing design.
- Strong for social media and lifestyle branding, where unique, share-worthy images drive engagement.
- Useful in editorials, brochures, and automotive magazines, where creativity differentiates the visual narrative.
Perfecting Car Photos with Post-Processing and Editing
Nailing the car photography angles is just the start, the real piece of work is to drive engagement out of it. No matter how skilled the photographer, raw images often fall short of the visual standards today’s online car buyers expect.
Studies shows that high-quality product photography typically lifts conversion by about 30%, a pattern that translates to vehicle merchandising online.
Spyne bridges this gap between capture and conversion. Its AI-powered Virtual Image Editor, trusted by 3,200+ dealerships globally, reimagines automotive post-production. It amplifies creative intent and delivers studio-quality results without the studio overhead, minus the studio overhead.
How Spyne Redefines Automotive Post-Production
- AI Background Replacement: Spyne’s background replacement instantly replaces cluttered or dull backdrops with custom or choose 100+ studio-like backdrops.
- Number Plate Blur: This number plate blur tool masks number plates while adding dealership logos, ensuring privacy compliance, strengthening branding, and instilling buyer confidence in every listing.
- Car Color Changer: The car color changer tool lets users visualize cars in different color options instantly, sparking interest, emotional connection, and quicker conversion intent.
- 360-degree Spins: With this 360 spin creates smooth, interactive rotations that allow buyers to explore vehicles from every angle, fostering transparency, engagement, and faster decision-making.
- Car Visualizer: The car visualizer tool offers a 3D-like, interactive viewing experience where buyers can rotate, recolor, and explore vehicles virtually, recreating the showroom experience online.
Conclusion
The way a car is photographed can define how buyers perceive its value. Car dealers who master these car photography angles create listings that feel intentional, trustworthy, and visually consistent across every platform.
Achieving this level of precision at scale requires more than great clicks; it calls for intelligent automation. Spyne’s AI-powered platform delivers just that with its studio-quality car visuals with balanced lighting for consistency across inventories. The result you ask? Faster engagement, higher conversion, and stronger brand credibility.
With roughly 95% of buyers researching online, standardized, studio-quality imagery is table stakes, book a demo to scale that advantage.
FAQs
- Shooting without considering symmetry, which can make the car look off-balance.
- Using wide-angle lenses too close, causing distortion in shape and proportions.
- Ignoring the background, leading to clutter or distractions that pull focus from the car.
- Capturing images under harsh light without adjusting exposure, resulting in glare or dark shadows.
- Forgetting detail shots, which leaves out features buyers want to see.
- Over-editing in post-processing, making images look unrealistic or misleading.
Post-processing ensures your car photos reach their full potential by enhancing colors, contrast, and sharpness while correcting exposure and minimizing glare or reflections. With AI-powered tools like Spyne’s Virtual Studio, sellers and photographers can edit at scale, instantly replace backgrounds, optimize lighting, and deliver marketplace-ready images that drive higher engagement and conversions.
Yes, most marketplaces and classified platforms like CarGurus, TrueCar, Facebook Marketplace etc may require specific car photography angles to maintain consistency and transparency for the buyers. Standardized shots such as the front, rear, side, interior, and ¾ views help buyers easily compare vehicles and trust what they see.
High-quality images directly influences buyer interest and engagement, as customers are far more likely to click, inquire, and book test drives when visuals are sharp, well-lit, and detailed. Professional car photos showcase the vehicle’s features and condition, reducing uncertainty and speeding up the decision-making process. For dealerships, this translates into stronger leads, higher conversions, and lower time-to-sale.
Capturing multiple cars daily can be time-intensive for dealerships, but streamlined workflows and technology can speed it up significantly. Using photography templates or angle guides helps staff capture the required shots quickly and correctly. AI-powered solutions like Spyne’s Virtual Studio automate much of the process, instantly editing, standardizing, and enhancing photos while allowing background replacement at scale.