

Photo editing is supposed to enhance our images and give us our desired results, but the same photo editing can make things go south if it isn’t done right. While editing pictures, it is normal for a person to get carried away, but if you are a professional photographer, your portfolio is supposed to get you to work. Poor image editing can do even more harm. But don’t worry; this article will discuss the 10 most common photo editing mistakes and how you can fix them.
What is a Photo Editing Mistake?
A photo editing mistake refers to an error or oversight made during the editing process that negatively impacts an image’s quality, aesthetics, or accuracy. This can include overprocessing the idea, leading to an unnatural or exaggerated look, incorrect white balance adjustments, inaccurate color representation, or improper retouching techniques that create unrealistic or unnatural effects. These mistakes can detract from the photograph’s intended message or visual appeal and may require correction to achieve the desired outcome.

12 Most Common Photo Editing Mistakes and How to Fix Them
1. Cropping too much
Let’s start with the simple one. Overcropping is an issue that is needed to be addressed in the industry right now. Sometimes photographers have a certain composition in mind, and in order to achieve that, they leave most of it for the editing part.
This can lead them to poor framing choices, which they hope to fix during editing. But it’s not the best strategy because by the time you reach the editing table, the picture you had in mind is almost blurry, and you start improvising, which can sometimes lead to cropping the image too much.
Many other factors can lead to it, but overcropping is surely an issue that needs addressing.
So, here’s how you fix it. If there is extra space around the subject, you can create a nice composition. You can either use the three-point rule or make it into a portrait depending on the type of picture you have clicked and the surroundings.
2. Smoothening the skin too much (plastic appearance)
While delivering your clients or editing portraits for your personal project, it is okay to make your subject look good or, in some cases, perfect. Now to achieve this perfection, a lot of photographers go overboard and turn a real person into a Barbie doll or a plastic appearance.
There is a minimal number of people who would actually appreciate such an edit. Still, for most, it might come across as offensive because it lacks the real factor and gives unrealistic expectations to normal people.
Now, this does not mean that it is bad to make skin clear or remove blemishes here and there. This is the reason why all these beauty editor tools exist.
But you can always avoid photo editing mistakes to make the photo unrealistic by keeping the original one on the side while editing your picture. This can help you navigate the editing process and help you do just the right amount of edit.
3. Sloppy background edit
Another common photo editing mistake is the poor removal of the background. It is possible that you might click your subject perfectly, and with editing, you are able to enhance it. But while removing the background, there are possibilities that you might ruin it entirely to make your entire picture look unattractive.
One of the hardest things about background removal is dealing with a complex background and getting the lights and shadows to match with your subject. This becomes easy when you are doing the photoshoot in front of a green screen, but it is surely an issue while shooting somewhere else.
But there is a trick to fixing this. The trick is to plan ahead. If you have a certain background in mind, execute your photo so you can align your picture with that background.
This you can do by doing the photoshoot in the lighting that even remotely equals that background. Proper planning can really help you remove background with perfection.
Check Out Amazing Shoe Photography Tips and Tricks
4. Taking HDR too far
This is another spectrum of image editing that can affect your image in a huge way. HDR stands for High Dynamic Range. This can help you in getting the details back in your subject when your whites become too white and dark become too dark. It basically reverses the effects of a washed-out image and gives it the detailing back.
Now there is a very thin line between using an HDR right and using it too much. Since HDR mode can be achieved digitally, it is important to handle it with care, or the picture becomes too unrealistic.
5. Playing with monochrome features too much
The whole point of doing monochrome photography or turning a colored picture into monochrome is to take away the attention from bold features and create a subtle dramatic picture depending on your goal.
But it can look appealing to play with the features a little with deep sepia tones. This might do the opposite of what you are trying to achieve. Here’s why.
Using deep sepia tones make your pictures look unnatural. They give your pictures a muddy look that can cause your photo to look overdone. This takes away the whole magic of monochrome editing. You can fix that by keeping those monochrome features light.
6. Working on the original file
This is a rookie mistake that any photographer can fall prey to. Editing the original file might even be considered as a sin in the editing world. There are a number of reasons why it’s definitely not a good idea to do so.
For starters, you won’t have any original pictures to refer to while making the edits. So when you are done with the editing, you won’t remember what the real one looked like, and you risk going too far with the editing.
Also, if your client or your own eyes do not appreciate your final edit, it would be impossible to go back to the start since there is no ‘start’ left. This is why it is best to avoid such photo editing mistakes by duplicating the file or at least layer while doing editing in Photoshop.
7. Not knowing about editing tools
You must know at least 50% of the editing tool you are using to start with. When you start using a tool, you see so many features and buttons, but it’s possible that you might not know about any of them.
But if you are aware of 2-3 buttons, this won’t cut the deal as many processes are involved in editing a picture. The most skilled editors have to keep learning about features, so the mistake here is not giving much attention to the learning part, which might limit the growth of your editing and the quality you are trying to achieve in your pictures.
So, make sure that you learn about new tools so that you can be aware of what to use and when to use them while making the edits.
8. Sparkling eyes and white teeth
You must have seen those pictures of angels and babies on Facebook in 2010 where their eyes sparkled and their teeth looked so white that they made you question your dental hygiene.
Well, it’s true that adding a little sparkle to the eyes can make them look alive, but going overboard with it can give the picture an alien effect. This means that your subject might start looking like a being from another planet.
So the key is to keep it subtle and start with small changes to the eyes. This way, you can better control the outcome.
The same goes for teeth whitening. It is true that white teeth look attractive, but overdoing them not only looks unnatural but can also be seen from a mile away. If your client posts such pictures on their social media, someone might even call out the edit due to its unrealistic nature. This is why it is important to make small changes and follow a simple rule – “Less is more.”
9. Ruining the image with contrast
While editing your image, you risk turning your image flat. This happens when you change the contrast of your image. When you increase contrasts too much, you turn your whites into too much white and dark into too dark.
This can take away the details from your picture and make it look unappealing. The key is to start your changes by paying attention to the details rather than making a big general change. This can give you more control over your image and a rather bewitching edit.
Another thing that you must know is that a lack of contrast can do the opposite effect and give you a flat image. So follow the simple rule of paying attention to the details.
10. Leaving everything for the edit
Now, this is something that we discussed in one of the initial points. It is common for photographers to leave everything for editing while not paying much attention to the right camera settings and lighting.
And this leaves all the major changes for the editing part. Now you may not believe this, but when you start editing in such scenarios, you take it too far whether you want it or not.
While the key to editing is “less is more”, your focus changes to doing more and more editing so as to achieve a perfect picture. So avoid that by putting more focus on the photography part. This will help you avoid the editing mistakes of doing it too much.
11. Color difference in real and in photo
Inaccurate colors can significantly impact a photograph’s overall perception and quality and is a huge image-editing mistake. Color correction helps to adjust and balance the tones, hues, and saturation levels to reflect the true colors of the subject and the intended mood or atmosphere.
It allows photographers to correct any color cast caused by lighting conditions or camera settings, enhance the vibrancy and depth of the image, and ensure that the final result is visually appealing and conveys the intended message or aesthetic.
12. Too many distractions in the image
A lot of noise in your image can be undesirable and be an error in photos for several reasons. First, noise can degrade the overall quality and sharpness of the image, making it appear grainy or pixelated. This can result in a loss of detail and make the idea less visually appealing.

Additionally, noise can distract viewers from the intended subject or message of the photograph. It can draw attention away from important elements and create visual clutter. Noise can also affect the accuracy of colors and tonal variations, resulting in an inaccurate representation of the scene or subject. However, these can be fixed by following the rules of editing photos.
Photo editing is one of those things that require practice that leads to perfection over time. If you want to make perfect edits, it is best to start by capturing more and more pictures. This can give you an idea of different photo compositions and color usage. Also, you will better be able to get the psyche behind editing a picture.
If you are new to photo editing, there are plenty of free editing tutorials on YouTube that you can follow. The key is to know your editing tool and practice more and more. If you are a photographer looking for professional photo editing services, raise your request.
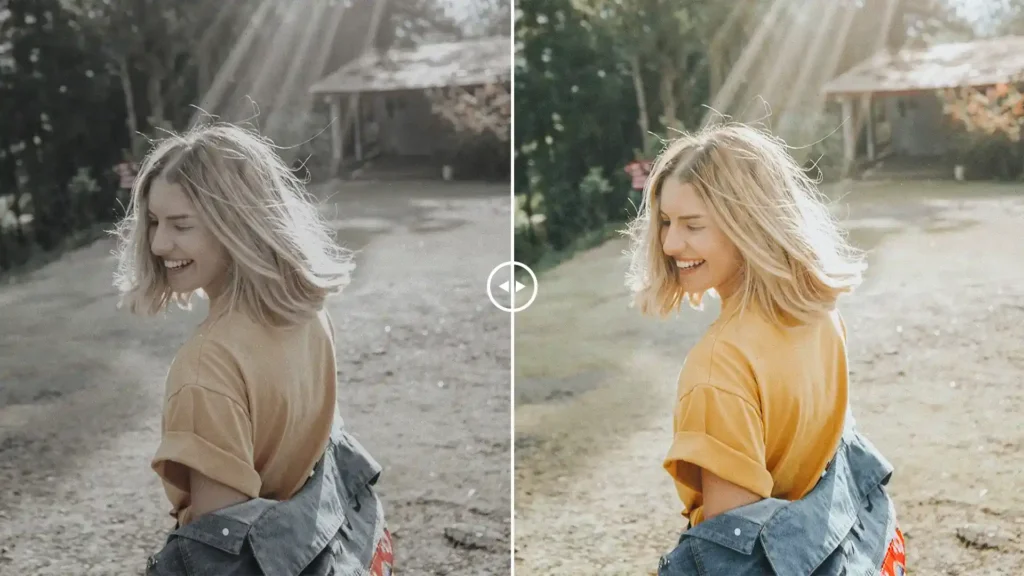
With Us, Your Images Would Look Like This!
Conclusion
Photo editing mistakes can significantly impact the quality and effectiveness of your visuals, whether it’s for personal or professional use. By avoiding these common errors and following the tips and techniques outlined in this blog, you can take your photo editing skills to the next level and create stunning visuals that truly capture your audience’s attention. Remember always to pay attention to the details, take the time to experiment and explore new tools and techniques, and, most importantly, have fun with the process. With some practice and patience, you can develop your unique photo editing style and create visuals that truly stand out. So go ahead, put these tips into practice, and watch your photo editing skills soar!