
The purpose of photo retouching is not to recreate a specific image you have in mind but rather to enhance the representation of your product in a photograph. The quality of the original image directly impacts the effectiveness of post-production efforts.
A higher-quality source image increases the likelihood of achieving the desired improvements through retouching. Product photo retouching is like adding seasoning to a dish – a little goes a long way and can make a significant difference. However, it is essential to note that it is often seen as a magical solution to fix all issues, which can be a misleading assumption. This article will delve into image retouching benefits and best practices. Let’s dive in!
What Is Photo Retouching?
Photo retouching is a series of targeted modifications within the image. These are done on a digital image to enhance the visual appeal or adjust technical attributes. Standard retouching techniques include resizing, color correction, shape adjustment, and removal of defects. Among the widely used retoucher platforms for image editing, Photoshop is one of the most popular choices. The photo editing process is often swift, with each photo taking between a few seconds to a couple of minutes of your time.
The duration of editing primarily depends on the desired final look of the image. During this stage, global adjustments are made, such as correcting lighting/exposure, color temperature, and cropping. The number of photos that need editing depends on the size of each batch captured. Typically, photographers offering photo retouching services begin by filtering out images that do not meet the required standards. Each photo is carefully assessed to determine whether it will be included in the final selection for delivery to the client and subsequently undergo the necessary edits.
Basic improvements to an image, for example, cropping, composition, and color corrections, can be categorized in photo editing. In contrast, more specific adjustments within the image, like enhancement or removal of blemishes, can be considered photo retouching.
Why Is Photo Retouching Important?
A vibrant, sharp image with accurate color correction can captivate potential buyers on social media. It entices users to explore your online store, enticing them to zoom in and examine the intricate details. Ultimately, this pixel-perfect quality persuades potential customers to purchase, resulting in a successful sale.
Make it visually appealing
With the magic of professional retouching, an image is elevated to new heights, imbued with vibrant colors, enhanced details, and an overall visual appeal that captures the viewer’s attention and leaves a lasting impression. The meticulous process of photo retouching completely revolutionizes the perception of a product, turning it from mundane to mesmerizing and highlighting its unique features in a way that entices potential customers. Post-production can immensely impact a product’s overall visual appeal and marketability, making it an indispensable tool in the world of photography and visual marketing.
Improve brand recognition
Establishing a distinct brand identity through photo retouching offers valuable advantages for your marketing efforts. Utilizing colored backgrounds, personalized margins, and innovative shadow techniques enhances brand awareness. These elements harmoniously align with your brand’s image, captivating audiences and fostering a solid connection. Incorporating these intentional retouching choices creates a memorable and recognizable brand presence that sets you apart from competitors. This boosts brand visibility, engages potential customers, and leaves a lasting impression.
Bridge online and offline gap
The zoom functionality offered on various online marketplaces mitigates the limitations of virtual shopping by providing users with a near-tactile experience. This feature enables shoppers to closely examine the fabric texture and explore the intricate details of a product, creating a sense of immersion and confidence in their purchase decision. By virtually bringing the product closer to the shopper, the zoom feature enhances the online shopping experience and bridges the gap between physical and digital retail.
Meeting requirements and standards
During the photo retouching phase, various technical aspects such as sizing, background restrictions, file formats, and resolutions can be effortlessly addressed. Online marketplaces often impose specific guidelines and requirements for merchants to utilize these platforms effectively. By employing post-production techniques, sellers can ensure their product images meet the necessary technical specifications, enhancing their chances of seamless integration and optimal presentation on these channels.
Photo Retouching for Portraits
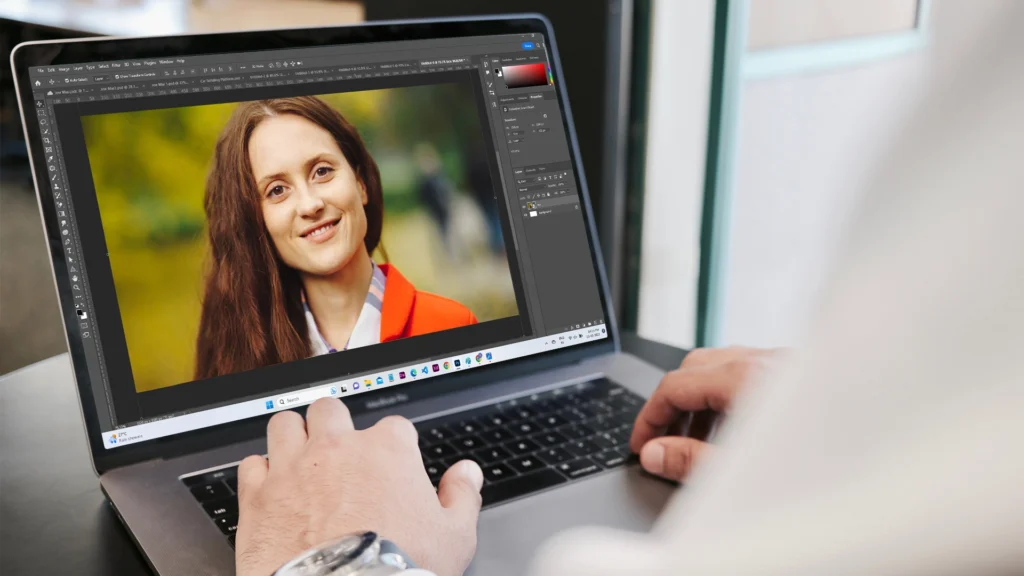
Throughout the process of picture retouching, portrait photographers and editors place significant emphasis on enhancing the subject’s skin, hair, and eyes. This meticulous editing involves eliminating imperfections like bumps and blemishes, refining flyaway hairs, enriching colors, fine-tuning contrast, and meticulously adjusting contours and highlights to achieve a visually stunning result.
Step #1: Convert to RAW format
Many photographers capture images in RAW format, recording unprocessed and uncompressed photographs. When not shooting in RAW, the camera automatically converts pictures to JPEG format, resulting in compression and loss of certain information. By shooting in RAW, all original data is preserved, providing greater flexibility for adjustments such as correcting exposure issues and ultimately producing higher-quality images.
Step #2: Cleanup image
When retouching a portrait, several aspects must be considered, such as the skin, makeup, and hair. Every picture has imperfections that require removals, such as blemishes, flyaways, or minor makeup smudges.
Clean up noticeable skin areas like blemishes, red marks, or discoloration. It blends the color and luminosity of the targeted region, effectively eliminating the imperfection. Adjust the editing brush size to slightly larger than each spot for optimal outcomes and maintain realistic skin texture to prevent excessive blurring.
Additionally, you can duplicate a selected photo portion, allowing you to replicate those pixels in another area precisely. This technique proves helpful in removing fine facial hair around the nose or chin, for instance, without compromising the natural borders of those features. The clone tool can also assist in correcting imperfections within the subject’s hair.
Step #3: Dodge and burn
Dodge and burn involve manipulating light and darkness within an image to achieve a balanced skin tone. Dodging brightens specific areas while burning darkens them. By selectively adjusting contrast, you can create an ideal skin texture.
Determining where to apply dodge and burn is subjective, much like applying makeup. Typically, you’ll want to enhance areas where light naturally falls on the face, such as the forehead, bridge of the nose, and chin. For burning, focus on areas where shadows naturally occur, like cheekbones, jawline, and hairline—similar to contouring.
Step #4: Color grade correction
There are various techniques available for color grading that you can explore. One example is using the gradient map tool, which allows you to handpick specific colors for highlights and shadows. By adjusting the opacity, you can control the intensity and subtlety of these colors, resulting in a captivating and nuanced effect.
A solid grasp of complementary colors is beneficial to achieve effective color grading. Skillfully incorporating complementary colors can infuse your portrait with vibrancy while maintaining a natural and harmonious appearance.
If you prefer not to make these adjustments manually, you can experiment with portrait actions and filters. Once content with the portrait’s color and tone, you can crop, resize, save, and share the final image.
Product Photo Retouching for E-commerce

When engaging in online shopping, understanding how a product looks and feels is crucial before purchasing. It falls upon the photographer and retoucher to capture and convey all that essential information through compelling photographs. By understanding the art of photography and photo retouching, you can create stunning and precise product photos that seamlessly align with your brand and aesthetic.
Photo Retouching Services for eCommerce Business
- The color correction stage involves adjusting exposure, intensity, detailing, and shadows to enhance the overall appearance of an image, particularly for RAW files. A skilled retouching specialist aims to make the print vibrant and visually striking.
- Product cleanup focuses on removing defects and imperfections, such as dust specks and scratches, to ensure a flawless presentation.
- Resizing and saving the image in a specific file format are determined by the technical requirements of the distribution channel, whether it’s a marketplace, social media platform, or large-scale display.
- The ghost mannequin effect involves skillful manipulation to create the illusion of an invisible person wearing a piece of clothing.
- Wrinkles removal is a complex editing technique that eliminates or smoothes out wrinkles, providing a polished appearance.
- Shape and silhouette correction is commonly applied to handbags and garments, often requiring meticulous masking and path techniques for pixel-perfect results, particularly in higher resolutions.
- “On model” photo retouching is a meticulous process that ensures the perfect fit of a product on a model, achieving an impeccable presentation.
- Dodge and burn (D&B) is a technique primarily used for portraits and lifestyle shots. A product photo editor strategically applies dark and light accents to add depth and dimension to the image.
- Using masking or clipping path techniques, background removal eliminates complex backgrounds or isolates the subject for social media collages.
While resizing, formatting, and color correction are typically included in the standard per-image pricing, high-end photo retouching services may incur additional charges. It should be noted that online photo retouching might offer you more affordable services.
What Does Product Photography Retouching Include?
How Does the Retouching Process Work
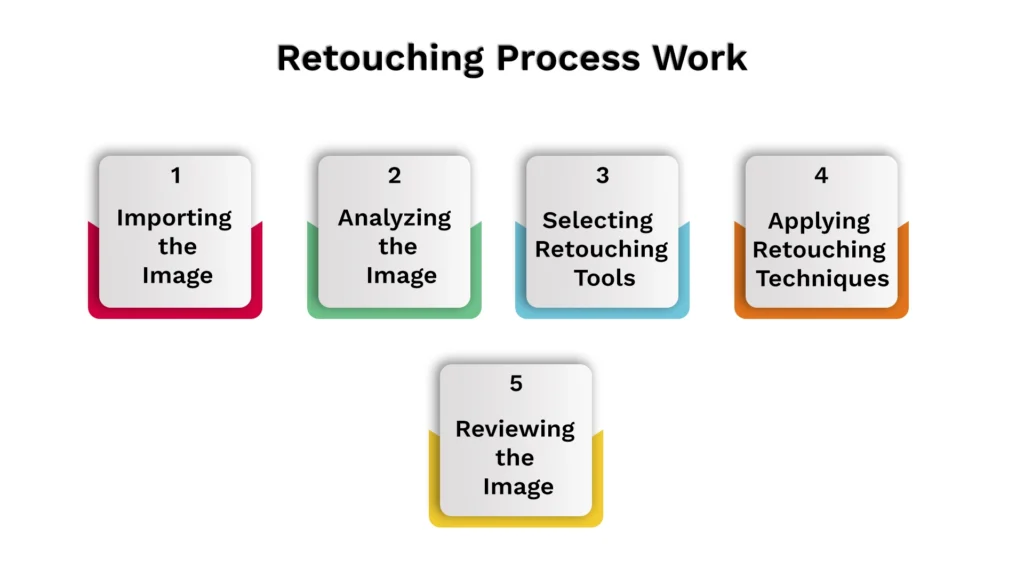
Photo retouching encompasses the use of various editing tools and techniques to enhance an image. While the exact process may vary based on the specific retouching job, it generally involves the following steps:
- Importing the Image: The initial step is importing the image into the editing software. This is typically done by launching the software and selecting the image file from the computer’s hard drive.
- Analyzing the Image: After importing, the retoucher carefully examines the image to identify improvement areas. This may involve addressing lighting issues, eliminating blemishes, adjusting colors, or enhancing overall composition.
- Selecting Retouching Tools: Once the image has been analyzed, appropriate retouching tools are chosen for the task at hand. Commonly used tools include clone and healing brushes, dodge and burn techniques, and the liquify tool.
- Applying Retouching Techniques: With the chosen tools in hand, the retoucher proceeds to use the retouching techniques. This involves making necessary adjustments to the image, such as removing wrinkles, refining shapes, and enhancing skin tones.
- Reviewing the Image: Upon completing the photo retouching process, the retoucher thoroughly reviews the image to ensure it meets their own standards and fulfills the client’s expectations. We will make any further adjustments before progressing to the following image.
How Much Retouching Do I Need?

Simply put, your preferences and budget are the key factors in determining the extent of retouching work needed. However, let’s delve into more details:
The quality of the source image: The closer your shot is to the desired outcome in terms of quality, the less retouching work will be required.
The intended display channel: Images displayed in small sizes on marketplaces without a zoom-in feature may require less retouching. However, website images with zoom-in capabilities for product pages must be flawless, vibrant, and visually appealing.
The size and resolution of the image: The extent of photo editing services needed varies based on the size and explanation of the picture. Large-scale commercial ads and social media images, such as big board displays, may require more extensive editing due to their size and the need for great detail.
The type of photography: Different types of photography, such as model shots, lifestyle images, hero shots, beauty, and fashion shots, often demand more attention from the photo editor compared to standard upfront product photos for marketplaces.
As a general guideline, the better the initial image quality, the less extensive the photo retouching work will be.
Retouching Techniques to Know
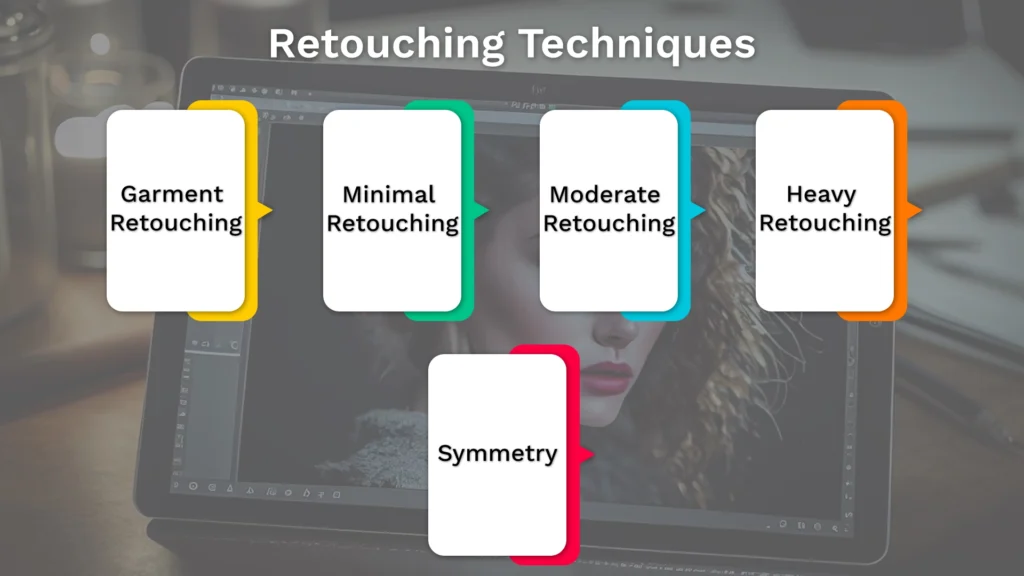
Garment Retouching
The primary of garment photo retouching services is cleaning up imperfections and refining the garment’s shape. Even with careful styling preparations, sample garments are unlikely to be flawless.
While stylists can address some issues through preparation, pinning, and creative arrangements, what can be done when the fabric is too transparent, the color is inaccurate, or one leg appears longer than the other? Photo retouching can resolve problems the studio cannot address while simplifying many other challenges.
Minimal retouching
Minimal retouching primarily focuses on cleaning up the image by removing unwanted elements and making necessary repairs. It involves addressing obvious flaws without delving into aesthetic alterations.
In most cases, removing any signs of styling, wear, or construction issues is crucial. This includes removing dust, pins, untidy stitches, and loose threads. Additionally, it entails smoothing out prominent creases like packaging creases or folds resulting from styling adjustments.
Minimal photo retouching also encompasses recreating areas that require restoration after removing small props like hangers, wire hands, or cutaway mannequin necks. If you have a limited budget, opting for this level of retouching is advisable. Presenting a product with visible wear and protruding pins inaccurately represents its quality.
Moderate retouching
Moderate-level retouching focuses on the cleanup and incorporates shape smoothing into the process. It involves performing tasks like light retouching while making subjective aesthetic decisions to enhance the image proactively.
In this level of retouching, you continue to eliminate packaging creases, but now you also address creases and folds resulting from misfits or styling challenges. For instance, if a product fits too tightly on a mannequin, causing uneven wrinkles on opposite sides of the body, you can reduce those creases through photo retouching.
It encompasses all the cleanup aspects of light retouching while introducing improvements relevant to nearly all product images. If you encounter specific challenges that aren’t adequately addressed at this level, consider employing heavy retouching for more advanced alterations.
Heavy retouching
Extensive retouching focuses on intricate details such as shadowing, imprints, and maintaining consistency throughout the image. Similar to the medium level, heavy retouching includes all the tasks performed at that level, with the addition of further retouching techniques.
It’s important to note that a heavily retouched image should not appear artificial or “plastic.” Heavy photo retouching should never give the impression that the image is fake. This is crucial for maintaining credibility with viewers and establishing trust, ultimately leading to successful sales.
The heavy retouch level removes prominent creases and reduces the impact of hard shadows, contrasts, and highlights caused by wrinkles. This approach aims for subtlety and can significantly enhance images featuring challenging fabrics, such as laminated jackets.
Undesirable imprints can sometimes appear and create confusion about what is part of the garment and what is caused by external factors. For instance, sheer fabrics may reveal visible outlines of mannequins, undergarments, nipples, or pockets. Through retouching, these distractions can be eliminated.
Furthermore, retouching ensures consistent shaping of edge lines, such as sleeve cuffs, trouser cuffs, waistbands, and hemlines. Consistency in shape, whether it involves curving in, curving out, or remaining straight, is visually pleasing and demonstrates meticulous attention to detail, enhancing customer credibility.
Symmetry
Symmetry plays a significant role in human beauty standards, as various studies highlight the preference for more symmetrical faces. When asymmetrical apparel, such as jackets, dresses, tops, and pants, is photographed in a non-symmetrical manner, it appears untidy.
Such photographs may give the impression of a noticeable lean or imply poor construction quality. This effect is particularly evident in product images featuring mannequins or items on hangers, where there is no natural human movement to make irregularities seem organic.
In retouching, symmetry can be implemented by establishing guidelines and applying them consistently across your product category. Ensuring balance through photo retouching is a precious practice that contributes to creating a cohesive and visually appealing presentation. We highly recommend incorporating it into your retouching process regardless of the level of retouching performed.
Image Retouching Services offered by Spyne
As you might have noticed, image retouching is time-consuming and effort-intensive. If your business requires you to have the best photo retouching services, then automating the process might be the best course of action for you. Spyne offers all the image retouching functions and adjustments discussed in this blog. Spyne’s Artificial Intelligence is trained on millions of images, which allows us to carry out all these functions quickly and efficiently. Using Spyne’s app to click images will give you more access to assistance in clicking pictures. Thanks to automation, we can do image retouching and editing within seconds, making the process more affordable. We carry out various retouching and editing processes, for example:
- Lighting and angles are fixed
- Color correction
- Addition of margins
And a lot more. A darkroom has been provided to you above so that you can use it, get the process experience, and determine the quality of the processed images.
Conclusion
Whether you seek to make your products stand out amidst a sea of similar offerings on platforms like Amazon, establish a distinct brand identity, or simply eliminate any unwanted imperfections that may have accumulated on your product imagery, photo retouching is the key. Suppose you require enhancements such as color correction for your existing product images or a comprehensive photography and editing solution for your new collection. In that case, our team is here to assist you.
Collaborate with Spyne to ensure your visual content aligns with your goals and brand strategy, elevating your product presentation to new heights.