

Have you looked at the photos in magazines and other editorials and wondered why they don’t look the same as those clicked with your camera?
Of course, those magazine pictures are clicked by experienced professional photographers who use cameras that sometimes cost more than a car. Still, the professionals also have a secret that makes their photos look that way.
And today, we’ll reveal those secrets to you, through which you can also make your photos look more professional. We here at Spyne are Photo Editing Service Providers, and in this blog, we will share powerful and effective photo editing ideas. That will help you turn your average-looking photos into stunning, professional-looking images. We know these tips are very effective as our AI uses the same photo editing tips while working on your image editing projects.
So, whether you want to improve your portraits, products, ecommerce, or any other type of photography, stay tuned for our expert photo editing tips!
What are Photo Editing Ideas?
Photo editing ideas refer to creative techniques and methods used to enhance the visual quality of a digital photograph. So Photo editing is, modifying an image using software tools to adjust color, tone, contrast, exposure, and other factors. Photo editing ideas can be as simple as basic adjustments like brightness and contrast or as complex as advanced techniques like compositing multiple images, removing unwanted elements, and creating special effects.
Some image editing tips include cropping an image to improve composition or remove unwanted details, adjusting color and tone to improve overall quality, and adding text or images to create more unique images. Other techniques include using filters, removing imperfections or unwanted objects, and resizing or reshaping images to achieve a particular look or mood.
Ultimately, photo editing techniques aim to make photos more beautiful, relevant, and memorable for personal or professional use.
Photo Editing Basics
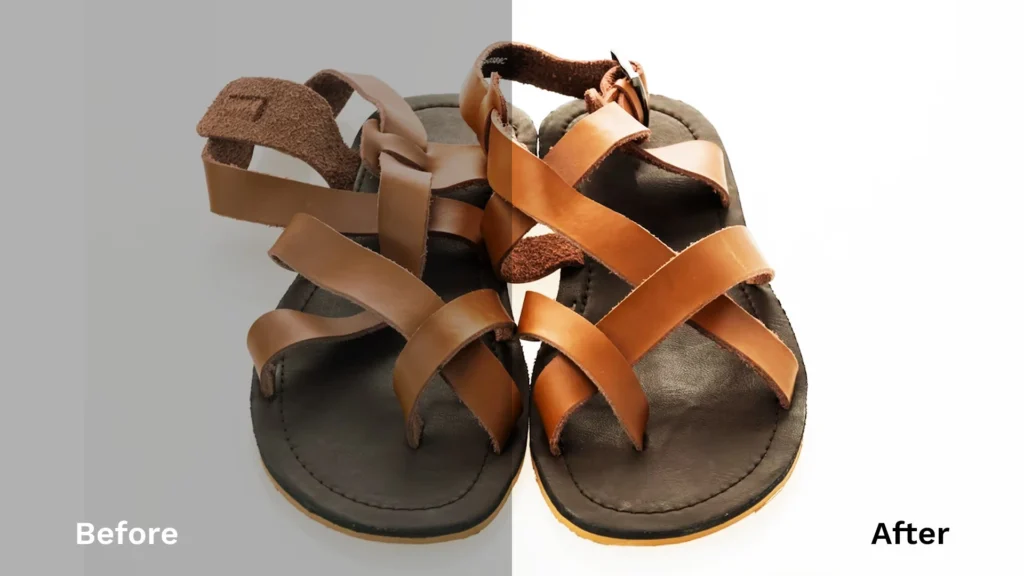
Photo editing can seem daunting, but it can be a fun and rewarding experience with the right tools and knowledge. Here are 7 basics of photo editing to get you started:
1. Crop and Straighten: Cropping is a technique used to remove unwanted elements from an image while straightening is used to correct the tilt or angle of the image. Cropping and straightening can improve the composition of your photo.
2. Adjust Brightness, Contrast, and Saturation: Adjusting the brightness, contrast, and saturation of your image can help to bring out the details in your photo and make it more visually appealing.
3. Remove Red-Eye: Red eye is a common problem that occurs when the camera’s flash reflects off the subject’s eyes. You can easily remove red-eye using photo editing software.
4. Sharpen: Sharpening your image can help improve your photo’s clarity and detail.
5. Color Correction: Color correction is adjusting an image’s color balance, tint, or hue to improve its overall color accuracy.
6. Remove blemishes: If your subject has flaws or imperfections, use the spot healing tool to remove them. This can make the subject look more polished and professional.
7. Adjust color balance: Sometimes, photos can look too warm or cool. Adjusting the color balance can help to correct this and make the photo look more natural.
Things to Think About Before You Begin Editing
Before you begin editing a photo, there are several things or photo editing ideas you should consider to help guide your editing process:
1. What is the purpose of the photo? Are you editing the photo for personal use or a specific project or client? Knowing the purpose of the photo can help you determine how to edit it.
2. What story does the photo tell? Consider the mood and emotions conveyed by the photo. This can help you decide how to adjust the colors, brightness, and contrast to enhance the photo’s storytelling ability.
3. What is the subject of the photo? Is the subject the main focus of the photo, or is it something else in the background? This can help you determine how much to crop the photo, adjust the focus, and more.
4. What is the lighting like in the photo? Consider the lighting in the photo and adjust it accordingly. If the photo is too dark or bright, you may need to adjust the exposure or shadows.
5. What is the intended audience of the photo? Think about who will be viewing the photo and adjust it accordingly. For example, if the photo is intended for social media, make it more vibrant and eye-catching.
Considering these factors before product photo editing can create a more cohesive and impactful final image.
Photo Editing Tips for Stunning Photographs
So if you are looking to get the same great quality results that professionals get by making a few tweaks and adjustments to their photo in post-processing, all you have to go through is these 9 effective and creative photo editing ideas.
1. Crop Your Photos
This is something straightforward. As you already know about this, let us assure you that photo editing ideas get more complex. Cropping and Straightening your photos drastically affect their look, dramatically improving their composition.
You need to crop everything that doesn’t add to the story. Cropping is a great feature, and it helps us make up for the composition in photo editing mistakes we make when clicking the image. Once you have cropped out all the extraneous elements, you are left with a powerful image that tells the story better.
2. Straighten Your Photos
And as now you recognize the importance of cropping, let us look at another example to understand straightening.
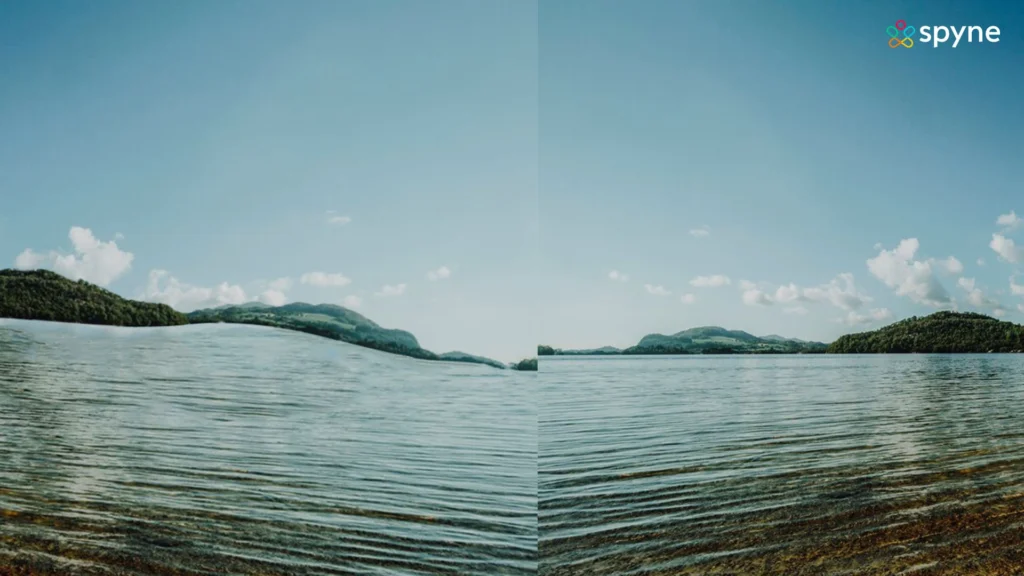
As you can see in the first picture, the horizon in the photo is not straight, which doesn’t seem much at first, but it takes away a lot of the photo’s impact. This is a widespread problem that professionals even face, as it is not that easy to capture a straight horizon. But with the help of straightening, we can align the horizon with an imaginary horizontal line across the photo to get a powerful and professional look from the end result.
3. Fix Unnatural Lighting
This next technique will help you transform your unnatural-looking images taken in artificial lighting into professional stunning night shots.
Let’s take a look at an example:
You can see that the first photo is filled with unnatural-looking colors. This is due to the fact that only artificial light was involved in capturing this image. And this happens quite often as most of the city lights give an extraordinary color to the image. And as you can see in the second image, we corrected the color so that the image doesn’t appear unnatural. As a result, you have a more realistic and natural-looking picture that is more pleasing to the eye. This can also be achieved by correcting the white balance of the images.
4. Remove The Unwanted Elements
In this technique, we help you eliminate all the unwanted elements in the photo so that you can push all the attention to the main subject in the photo. So let’s see an example:
We come across many photos like these. Here, the sunlight on the desk is not such a significant element, but it is also not contributing to the image. To emphasize our main subject, i.e. the laptop, we can eliminate the light on the table’s right side. Once the unnecessary elements are gone, you can see that the image automatically becomes way more impactful and starts looking professional. Most people get overwhelmed when it comes to removing such unwanted elements from the image, but with a bit of practice and some simple healing brushwork, you can remove any unwanted element from your photos.
5. Increase The Clarity Of Your Portraits
This is one of the coolest and easiest techniques that you can use to make your portraits look more dramatic and impactful. You can look at the example below:
The first portrait looks good, but the second portrait is more stunning. A little tweak, or a lot in this case, in clarity, can make your photo look more striking. This technique makes your images look like movie posters. Everyone on social media loves this technique. The contrasty look can help you get more followers on your Instagram. So whenever you post a portrait, don’t forget to increase the image’s clarity.
6. Make Your Black and White Photos More Dramatic
The black-and-white filters do a fantastic job of adding drama and mood to images. And to do the same and recreate such images, applying a black-and-white filter on your image would not do the trick. Let’s see an example:
The first photo shows you the black-and-white version of a colored image that we had. The picture looks okay but doesn’t have the drama and mood we were looking for. So to fix that, we went to the original colored image and adjusted the blue sky to make it look darker. So, as a result, applying the black and white filter to the current image will give us a black sky which is perfect for the mood we were going for.
7. Add Drama To Your Image
In this technique, we will tell you how adjusting the shadows and highlights can make your photo look esthetic and way better.
You can see that the dark areas of the first photo are pixelated and have a lot of noise that doesn’t look professional. And to fix that, all you need to do is make adjustments to the “Shadows” and “Blacks” of the photo. By reducing the Shadows and the Black, you can see a drastic improvement in the image. Now there is no more noise and distortion in the picture.
8. Remove Haze From Landscapes
This technique will show you how removing haze from your landscape shots can drastically impact you. The haze in images results from ultraviolet light, making your landscapes appear dull and lifeless. Let’s see an example:
As you can see, the first image looks good but still lacks the drama we were looking for. So to make the image more striking, we reduced the ultraviolet Haze of the photo. This is such a simple adjustment that it can be done with the movement of a slider. This also takes care of the slight bluish softness caused by ultraviolet light. Once the haze is corrected, you get to see the accurate colors of the image. The colors really start to show when you remove the gaze from your pictures.
9. Adjust Colours To Make Photos Look Lively
In this technique, we will show you how to bring out the blue in the sky to make your overall image more vivid and vibrant.
So let’s take a look at this example:
While the photo would have been okay, adding blue to the sky would liven up the sky. So, we selectively adjusted only the blue in the picture so that the adjustments would unnecessarily affect no other element. This is also very helpful when you take a photo of a building. The building is exposed properly, but the sky is overexposed to a point where it just appears white. You can apply the same selective color adjustment to achieve stunning photos.
10. Make Landscapes Look More Vivid
This technique makes your landscape photo look more vivid and vibrant by using Selective Colour Adjustment. To understand this better, let’s see an example:
The first image looks good, but we know we can improve it. However, there are better options than changing the saturation or vibrance of the whole image. Instead, we need to adjust the color of the sky, the water, and the grass. And that can be done by manipulating the colors of just these 3 elements through selective color adjustment. The final image has a more accurate depiction of the green and blue colors in the photo.
Photo Manipulation Ideas For Beginners and Professionals

Photo manipulation can be a fun and creative way to transform your images into something unique and eye-catching. Here are some photo editing ideas for photo manipulation projects for both beginners and professionals:
For Beginners
- Replace the background: One of the easiest ways to manipulate a photo is to replace the product photography background. You can use a solid color, a pattern, or a landscape image to create a new look.
- Add or remove objects: Use the clone stamp tool to remove unwanted objects from your photo or add new objects to create a surreal effect.
- Create a composite image: Combine multiple images to create a new scene. For example, you can add a person to a landscape photo or combine different animal images to create a mythical creature.
- Play with color: Use a photo editing tool to adjust your image’s color balance, saturation, and contrast to create a new look.
For Professionals
- Surreal landscapes: Create a surreal landscape by combining different images, adding special effects, and manipulating the colors and lighting.
- Retro posters: Use vintage or retro images to create posters that look like they were made in a different era. You can add text, adjust the color balance, and use special effects to create an authentic vintage look.
- Portrait manipulation: Use photo editing tools to manipulate a portrait image and create a new look. You can change the skin tone, add or remove makeup, and adjust the lighting to create a dramatic effect.
- Photo collages: Use photo manipulation to create a collage of different images, such as family photos, vacation pictures, or art pieces. You can combine different images, add text, and adjust the color balance to create a unique and personalized work of art.
10 Creative Photoshop Ideas to Try Yourself in 2023
1. Double Portraits: Create beautiful portraits using the double exposure technique by combining two different images into one photo.
2. Surreal Landscapes: Create surreal landscapes by combining multiple images and using creative filters and adjustments.
3. Neon Text Effects: Use neon colors and lighting to create eye-catching text that pops off the page.
4. Old Photo Editing: Give your photos a vintage look by adding grain, dust, and scratches, and use color grading to make the photo look old.
5. Abstract Art Collages: Create unique art collages by combining abstract shapes, colors, and textures and experiment with mixing genres and opacity.
6. Cinemagraphs: Combine stills and video to create stunning GIFs with minor changes and animation.
7. Double Exposure City Landscape: To create a dynamic effect, use double exposure to blend city silhouettes with human figures.
8. Pop Art Portrait: Use bold colors and shapes to create a Pop Art style portrait reminiscent of Warhol and Lichtenstein.
9. Creative Text Overlays: Overlay text on images in exciting ways, such as using text as a mask to reveal the underlying image or modifying the text to fit the structure of the image.
10. Surreal Photo Manipulation: Create surreal and dreamy scenes by combining different elements of different photos and blending them using advanced editing techniques.
Different Photo Editing Styles for Clean Editing
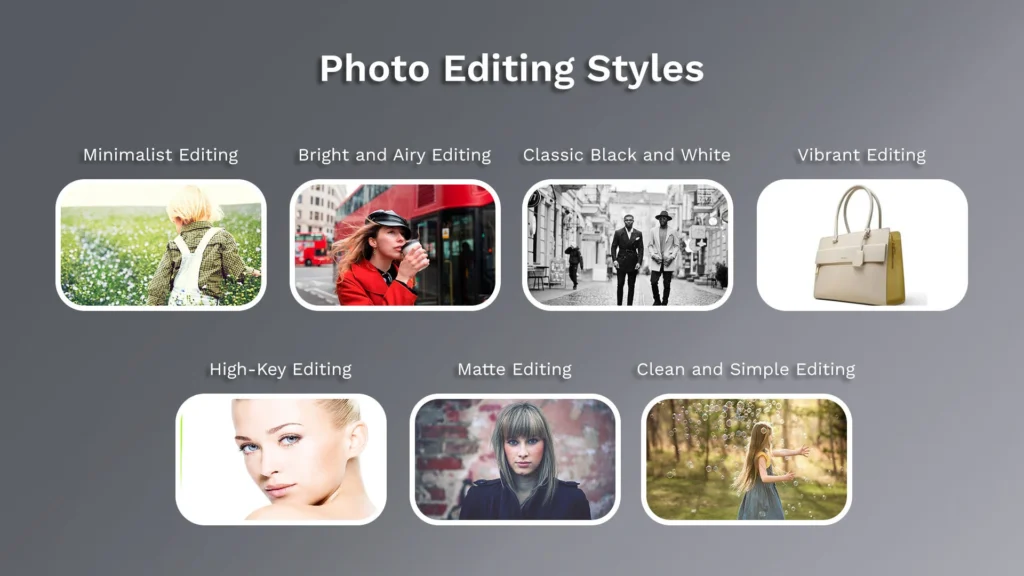
Various photo editing styles can be used to achieve clean and professional-looking photos. Here are a few examples:
- Minimalist Editing: This style uses a minimalistic approach to editing, focusing on enhancing the photo’s natural colors and tones. The aim is to create a clean and crisp look that is free of distractions.
- Bright and Airy Editing: This style involves using bright and airy tones to create a light and breezy feel to the photo. It involves brightening the highlights, reducing the shadows, and adding a soft glow to the overall image.
- Classic Black and White: This style converts the photo to black and white, creating a timeless and classic look. It is ideal for portraits, landscapes, and architectural photos.
- Vibrant Editing: This style enhances the photo’s colors to create a bright, bold look. It involves increasing the saturation and contrast to create a dynamic and eye-catching image.
- High-Key Editing: This style creates a bright white image by eliminating shadows and reducing contrast. It creates a clean and pure look, ideal for fashion and product photography.
- Matte Editing: This style involves adding a subtle haze to the photo, creating a vintage and dreamy look. It involves reducing contrast and adding a slight desaturation to the image.
- Clean and Simple Editing: This style involves minimal editing to create a clean and simple look. It is ideal for Amazon product photography, focusing on the product rather than the background or other distractions.
Conclusion
The purpose of editing is to enhance the beauty and impact of the original image. It’s not about changing reality or manipulating the viewer’s perception of the image.
In this blog, we explored various photo editing ideas you can use to create beautiful and visually appealing photos. There are endless ways to improve your photos, from simple adjustments like brightness and contrast to more advanced techniques like color grading and selection.
Always try different adjustments to find the best fit for your model and the image you are working on. And always remember the importance of maintaining the integrity of the original image while adding creativity.
With these photo editing tips in mind, you now have the knowledge and skills to take photo editing to the next level. So go out, create beautiful pictures, share your story, and inspire others!